
If you’re on tank water, the “how much is left?” question isn’t just curiosity. In summer especially, running low can turn into a very annoying problem very quickly, and water deliveries are something you want to organise early, not after the pressure drops mid-shower.
For ages, checking our tank meant walking outside and climbing a ladder to look into a dark tank. It’s awkward, it’s not safe, and it’s the sort of job you avoid until you really have to.
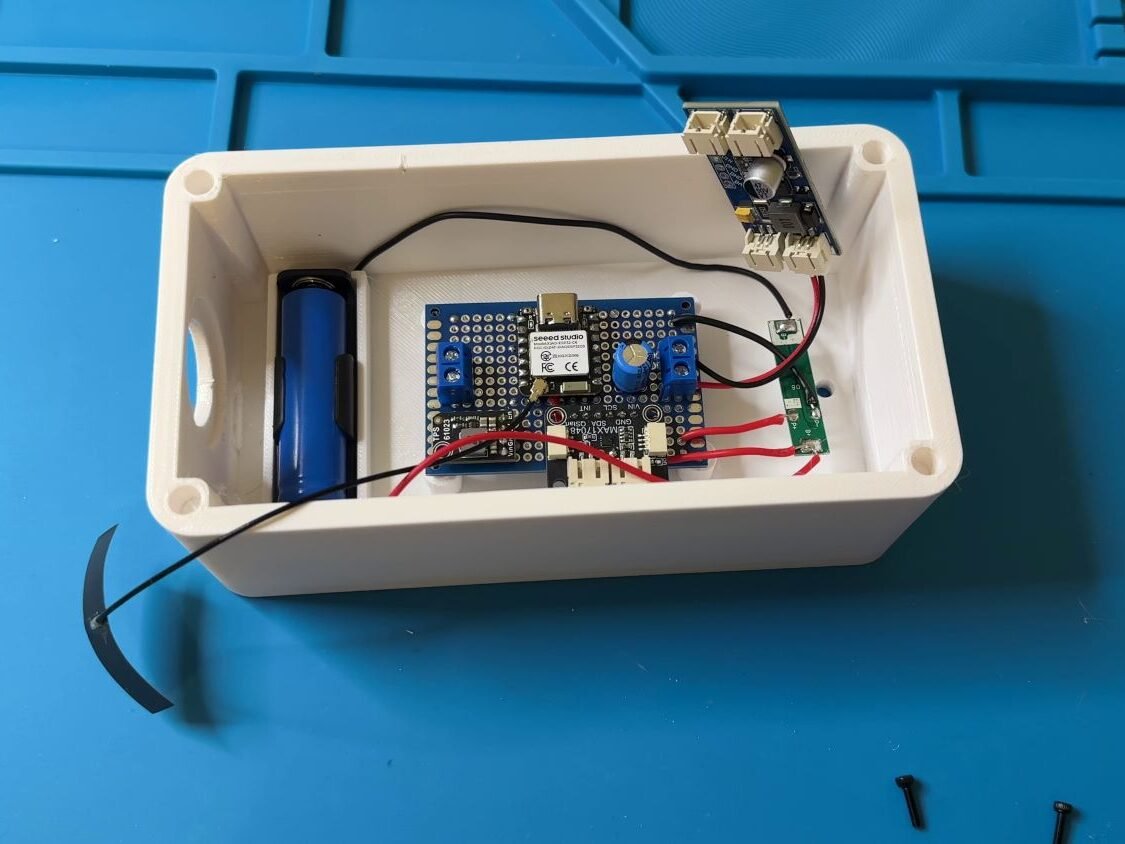
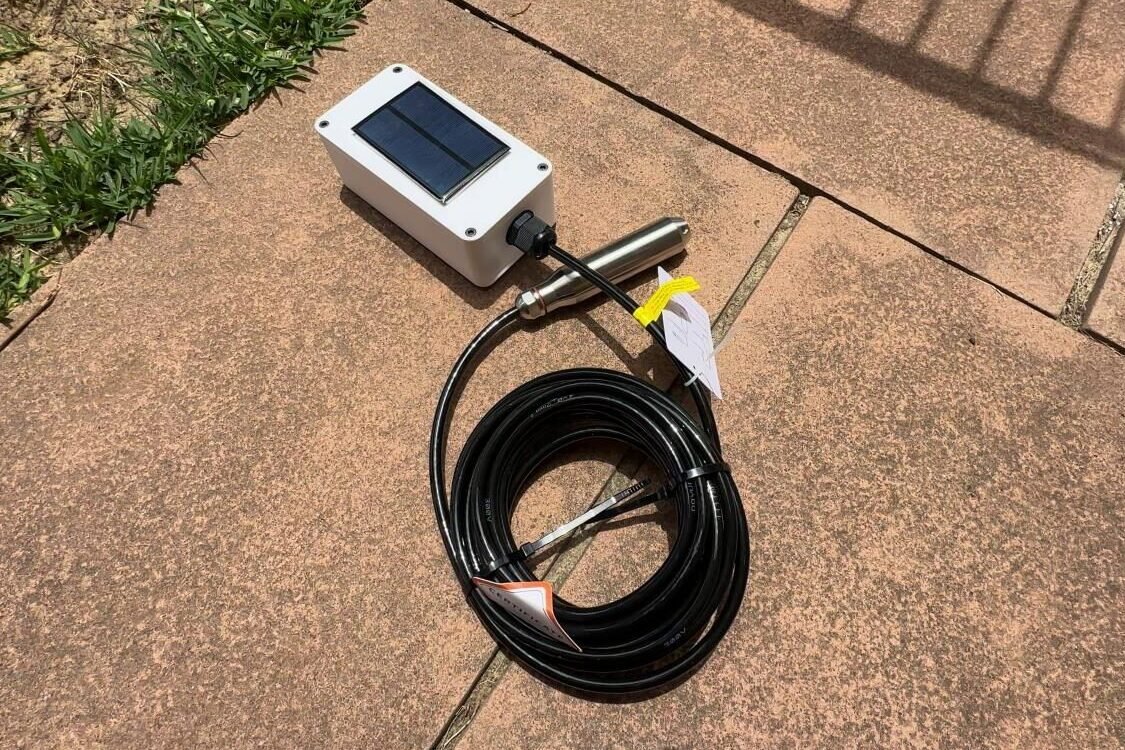
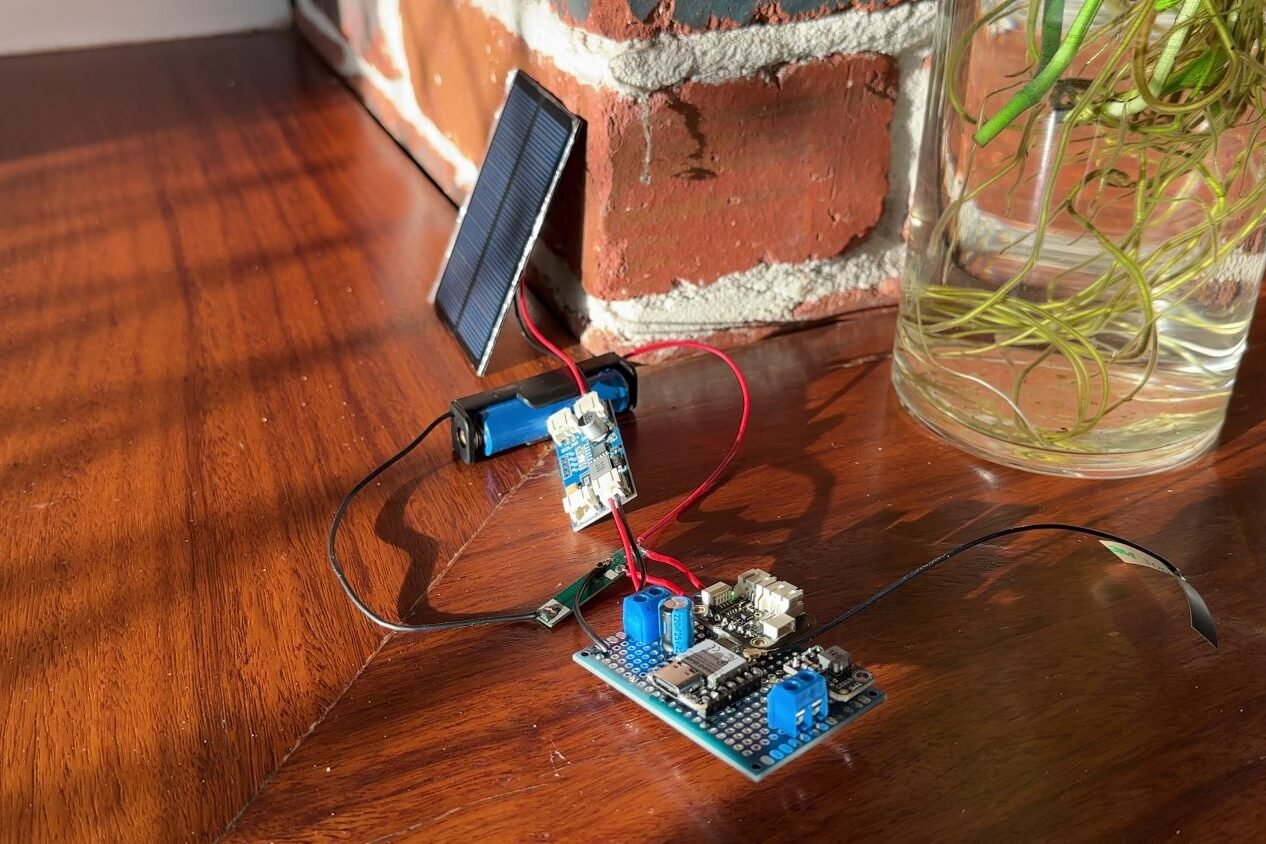
So I built a solar-powered water tank monitor that reports the level straight into Home Assistant, and is designed to run long-term with no maintenance. No battery swaps, no topping up, no pulling it down every few weeks to recharge.
This post breaks down the approach, the hardware, the power system, and the key software choices that make it reliable. I’m writing it a bit more “builder-style” than the video, so if you want to copy the project, you can.
Some of the links in this post may be affiliate links. If you buy through them, I may earn a small commission at no extra cost to you.
Build at a glance
This project is a low-power sensor node that wakes up on a schedule, takes stable tank measurements, reports them into Home Assistant, then goes straight back to deep sleep.
Key specs (my build):
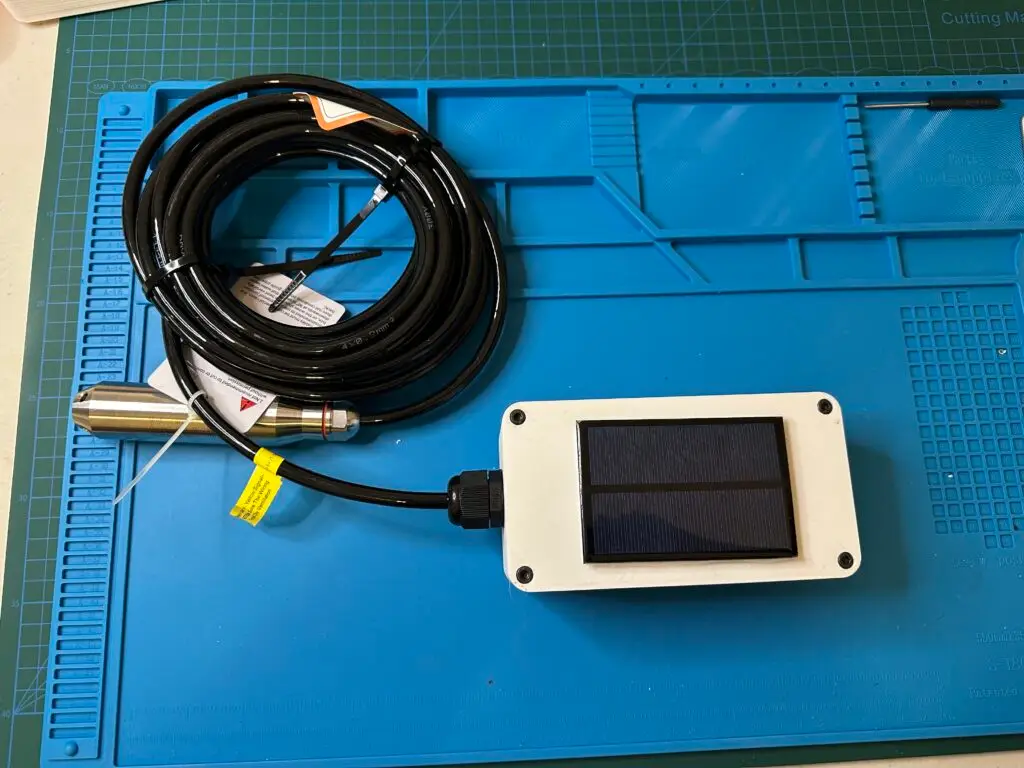
- Sensor type: Hydrostatic pressure sensor at the bottom of the tank (analog output)
- Tank height: ~2 m water column (adjustable for your tank)
- Update rate: Every 20 minutes (changeable)
- Connectivity: Wi-Fi (external antenna used for reliability)
- Power: Small solar panel + single-cell Li-ion battery + MPPT charger
- Power strategy: Sensor is only powered for a few seconds during readings
If you’ve got a tank further away or out of Wi-Fi range, the same approach works with LoRa too (I’m building that next).
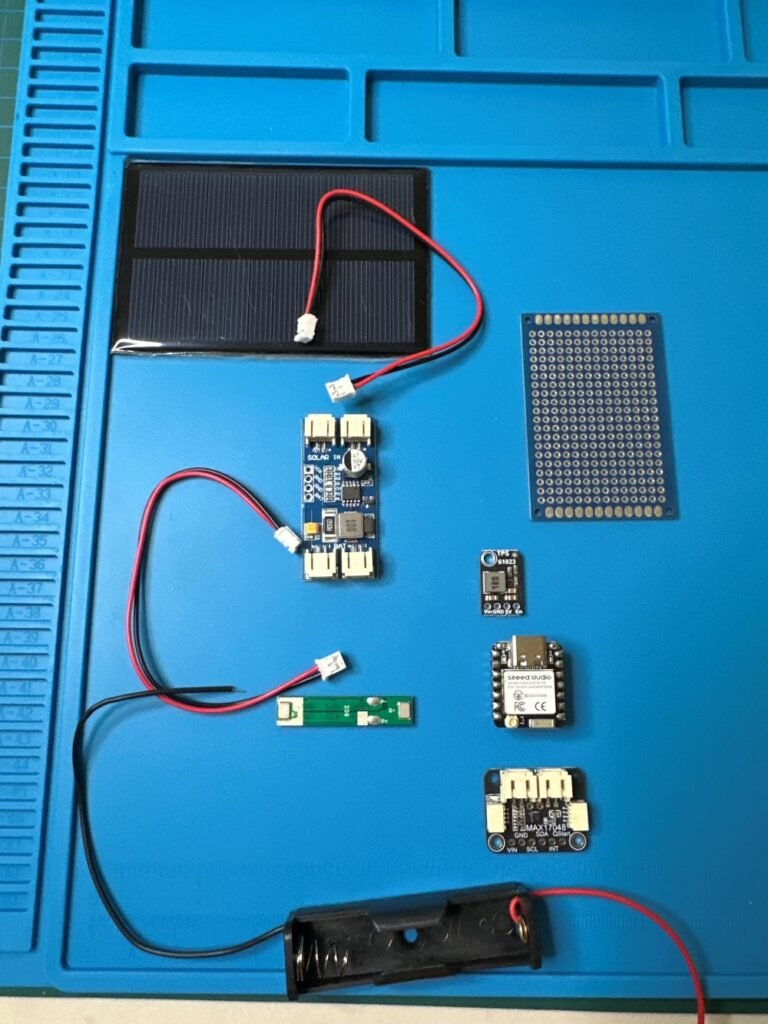
Hardware used
This is the core hardware in my build:
Core electronics
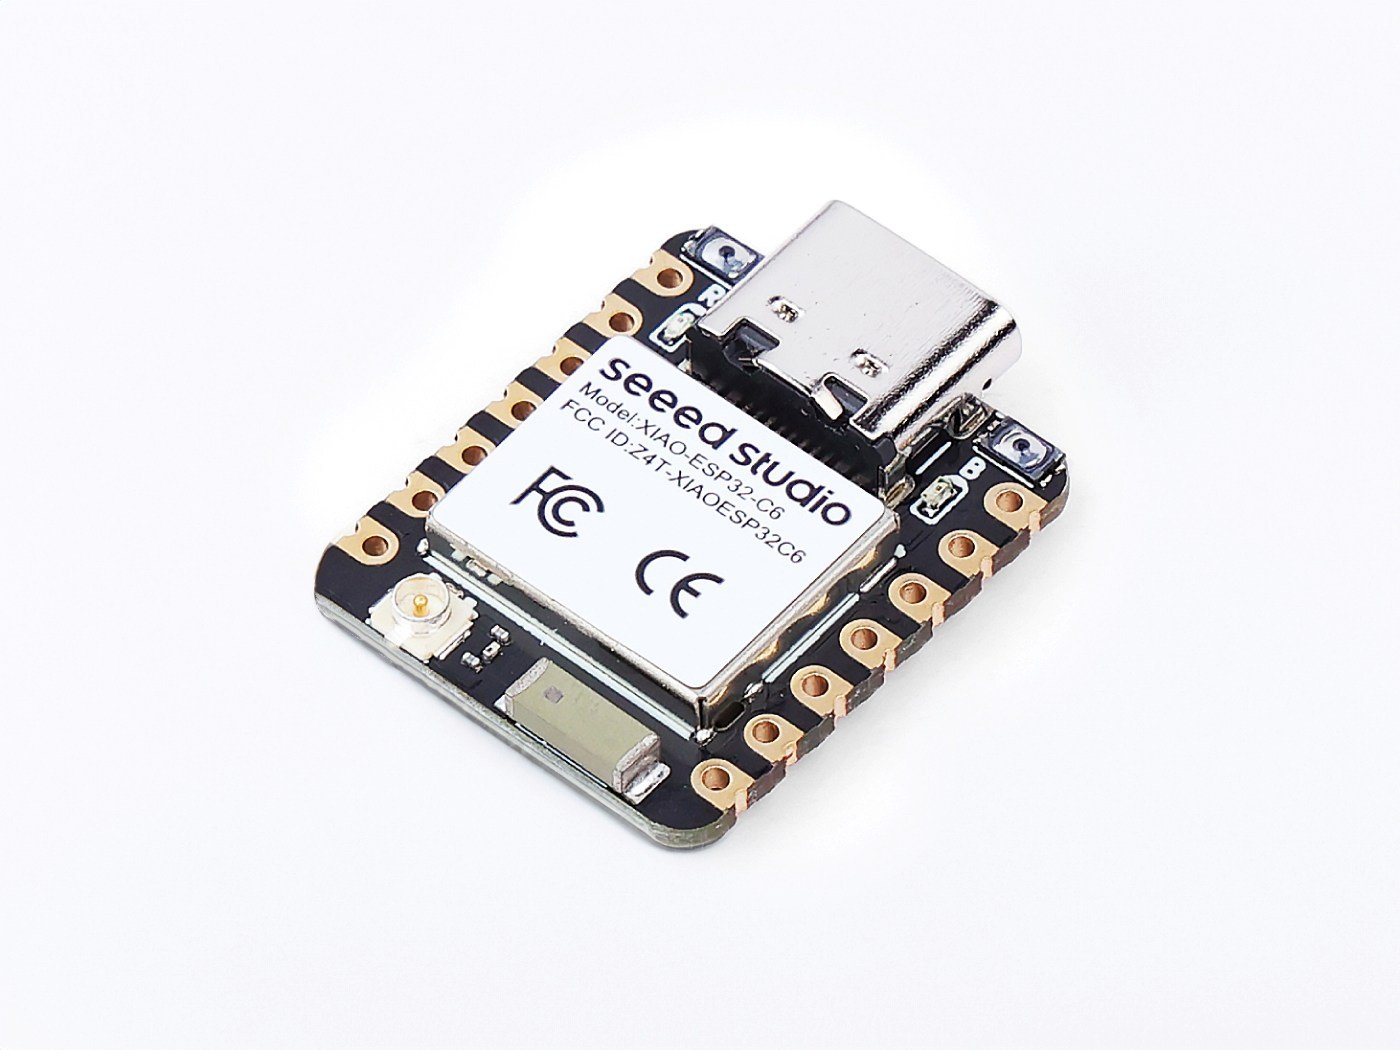
- ESP32-C6 running ESPHome (Wi-Fi)
- Chosen for Wi-Fi, low power features, and because I wanted to learn the C6 platform
- Pressure sensor mounted at the bottom of the tank
- Important: make sure the sensor output suits your ADC input
- In my case: 0-3.3V output and powered from 5V
- MAX17048 fuel gauge for battery monitoring
- This removes guesswork in solar builds and makes it obvious if the battery is trending up or down over time
XIAO ESP32-C6
A compact ESP32-C6 board with Wi-Fi 6, Bluetooth LE, Zigbee and Thread support, making it useful for newer smart home and IoT projects.
Power System
- Solar panel: 6V, ~167 mA (roughly 1W)
- Battery: 1S Li-ion, 800 mAh (3.7V nominal)
- Charger: CN3791 MPPT charge controller
- Protection: BMS for battery protection
- Sensor Rail: boost converter to generate 5V (only enabled during readings)
- 470uF 25V capacitor: smooths out the DC power and reduce small dips or spikes when the ESP32 or sensor draws power.
Connectivity
- External Wi-Fi antenna
- Used to improve link reliability and reduce connection time (which also saves power)
Enclosure
- 3D printed enclosure – My STL can be downloaded here
- If you don’t have a 3D printer, you can purchase a good quality one online
Before you build
This is a simple project once it’s dialled in, but a few checks upfront will save you hours of troubleshooting later.
- Confirm your sensor output range: Your pressure sensor must output 0-3.3V (or you’ll need a divider/conditioning). Do not feed a 0-5V signal into a 3.3V ADC.
- Confirm sensor type: Know whether it’s gauge (preferred for level stability) or absolute (may drift with weather unless compensated).
- Measure your tank height: Write down the usable water height in metres (this becomes your max depth and % scaling).
- Check Wi-Fi at the tank location: Do a quick phone test where the node will be mounted. If Wi-Fi is marginal, plan for an external antenna or consider LoRa.
- Plan power properly: Panel size, battery capacity, and your wake interval all matter. Longer wake times or frequent updates can overwhelm a small panel.
- Plan cable routing + sealing: Make sure the sensor cable entry is weatherproof and strain-relieved, and the enclosure is mounted where it won’t sit in direct spray or pooling water.
- Decide your calibration method: You’ll need three known points (empty / mid / full) or three measured depths so the dashboard values actually match reality.
Project goals
Here’s what I wanted this setup to do:
- Show the tank level accurately (not “roughly”)
- Send the data into Home Assistant
- Run on solar power
- Use ultra-low power so it can keep going for years without babysitting
The tank is about 15 m from the house and roughly 40 m from the Wi-Fi router, with walls in the way, so connectivity matters too. I wanted something I can trust, not a setup that needs constant attention.
Why I switched from ultrasonic to a pressure sensor
I’ve measured tank level with ultrasonic sensors before. They can work well, but inside a tank they deal with things like:
- Condensation and moisture on the sensor face
- Temperature swings affecting readings
- The occasional insect or debris causing random noise
This time I went with a pressure sensor mounted at the bottom of the tank. With a roughly 2 m high tank, the pressure at the bottom maps directly to the height of water above the sensor. In practice, pressure sensing tends to be more consistent over time in a sealed environment like this.
Trade-off: cost. This sensor is more expensive than the ultrasonic options I’ve used. But for something I want running unattended long-term, consistency is worth it.
I wrote a blog here about different types of water tank monitoring devices if you would prefer to try something else.
How pressure becomes “tank level”
A pressure sensor gives you a signal (usually a voltage). It doesn’t magically know your tank depth.
In simple terms:
- The sensor measures the pressure caused by the water column above it.
- That pressure is proportional to depth.
- You calibrate the raw reading so Home Assistant shows a useful number like depth (m) and percentage full (%).
One sensor detail that matters
Pressure sensors are commonly either gauge or absolute.
- Gauge sensors measure pressure relative to the atmosphere (often using a vent path).
- Absolute sensors measure against a sealed reference.
For tank level, gauge-style behaviour is typically what you want, because it naturally removes day-to-day atmospheric pressure changes. If you use an absolute sensor (or the venting isn’t correct), the level can appear to drift slightly with weather changes. You can still make it work, but it’s worth understanding upfront so you choose the right sensor and install it correctly.
If your sensor is rated “0-5V output” you’ll need a divider/conditioning to read it on a 3.3V ADC, otherwise you’ll clip readings or risk damage.
How the system works
The overall logic is simple:
- ESP32 wakes up (every 20 minutes)
- Powers the pressure sensor
- Takes multiple readings
- Filters the result (to remove noise/outliers)
- Converts the reading into real tank level
- Sends data to Home Assistant via ESPHome
- Goes straight back to deep sleep
Most of the time the ESP32 is asleep. The sensor is also unpowered most of the time. That’s the whole game when you want a small solar panel to keep up long-term.
Power strategy (why this runs long-term)
The reason this works on a small panel is the power strategy:
- The ESP32 spends almost all its time in deep sleep
- The pressure sensor isn’t powered 24/7
- The boost converter is only enabled for a short reading window
That last point is huge. Leaving a 5V sensor rail enabled all day can destroy your power budget. Switching it on only when needed is one of the biggest wins in the entire build.
Wi-Fi is often the biggest power hit
On battery devices, Wi-Fi connection time matters more than people think. A device that struggles to connect can burn a lot of energy doing nothing useful.
To reduce wasted energy, I made a few practical changes:
- Reduced transmit power
- Tweaked connection behaviour so it connects efficiently
- Assigned a static IP address. This reduces DHCP wait time during each wake cycle.
None of this changes what you see day-to-day, but it reduces the time the device spends fighting Wi-Fi, which matters when you want long battery life.
ESPHome + Home Assistant integration
The ESP32-C6 connects over Wi-Fi and pushes values into Home Assistant via ESPHome. I like this approach because:
- Everything stays local
- Dashboards and automations are easy
- Tweaks are quick when you learn something new
esphome:
  name: water-tank-sensor
  friendly_name: Water_Tank_Sensor

  on_boot:
    priority: 700
    then:
      # Enable RF switch function and select external antenna
      - output.turn_off: gpio3_rf_enable      # GPIO3 = LOW (enable antenna-select)
      - delay: 100ms
      - output.turn_on: gpio14_ant_ext        # GPIO14 = HIGH (external antenna)

      # --- Power 5V tank sensor rail and take readings ---
      - output.turn_on: boost_5v_en
      - delay: 1750ms   # Let tank sensor stabilise before reading

      # Take single reading from fuel gauge
      - component.update: fuel_gauge

      # ---- Take multiple raw readings from tank sensor and publish MEDIAN ----
      - lambda: |-
          const int N = 11;
          float v[N];

          for (int i = 0; i < N; i++) {
            id(tank_raw_voltage).update();
            v[i] = id(tank_raw_voltage).state;
            delay(100);
          }

          // insertion sort (tiny N, fast enough)
          for (int i = 1; i < N; i++) {
            float key = v[i];
            int j = i - 1;
            while (j >= 0 && v[j] > key) {
              v[j + 1] = v[j];
              j--;
            }
            v[j + 1] = key;
          }

          id(tank_raw_median).publish_state(v[N / 2]);

      # Now compute depth and % from the median voltage
      - component.update: tank_depth_m
      - component.update: tank_level_pct

      # Log the values once per wake so you can see calibration
      - logger.log:
          level: INFO
          format: "Battery: %.3f V (%.1f %%), Tank raw(median): %.3f V, Depth: %.2f m, Tank: %.1f %%"
          args:
            - 'id(batt_v).state'
            - 'id(batt_pct).state'
            - 'id(tank_raw_median).state'
            - 'id(tank_depth_m).state'
            - 'id(tank_level_pct).state'

      # Turn off 5V rail before sleep to avoid leakage
      - output.turn_off: boost_5v_en

      # Try to bring up Wi-Fi so values can be sent to Home Assistant
      - wait_until:
          condition:
            wifi.connected:
          timeout: 20s

      # If Wi-Fi connected, try API and hold briefly so Home Assistant can receive values
      - if:
          condition:
            wifi.connected
          then:
            - wait_until:
                condition:
                  api.connected:
                timeout: 10s

            - if:
                condition:
                  api.connected
                then:
                  - logger.log: "API connected, holding awake briefly"
                  - delay: 3s
                else:
                  - logger.log: "API did not connect before timeout"

      # Failsafe: make absolutely sure 5V rail is off
      - output.turn_off: boost_5v_en

      - logger.log: "Boot sequence complete, waiting for deep sleep timer"


esp32:
  board: esp32-c6-devkitm-1
  variant: esp32c6
  framework:
    type: esp-idf


logger:
  level: INFO


api:
  encryption:
    key: "YOUR_API_ENCRYPTION_KEY"  # From ESPHome
  reboot_timeout: 0s                 # Prevent API timeout from rebooting a battery node


ota:
  - platform: esphome
    password: "YOUR_OTA_PASSWORD"    # From ESPHome


wifi:
  ssid: !secret wifi_ssid
  password: !secret wifi_password

  output_power: 14db       # Adjust as needed. ESP32-C6 supports roughly 8.5 - 20.5dB
  power_save_mode: light   # Helps reduce Wi-Fi power use while still allowing connection
  fast_connect: true       # Useful if the device only connects to one known Wi-Fi network
  reboot_timeout: 15min    # Failsafe only. Avoid short reboot loops on battery nodes

  manual_ip:
    static_ip: 192.168.1.149     # Set your own static IP
    gateway: 192.168.1.1         # Usually your router IP
    subnet: 255.255.255.0        # Common home network subnet


# --- Antenna & 5V boost control pins ---
output:
  - platform: gpio
    id: gpio3_rf_enable
    pin: GPIO3       # XIAO ESP32-C6 RF switch enable

  - platform: gpio
    id: gpio14_ant_ext
    pin: GPIO14      # XIAO ESP32-C6 external antenna select

  - platform: gpio
    id: boost_5v_en
    pin: GPIO16      # Enable pin for the 5V boost converter
    inverted: false


# MAX17048 fuel gauge uses I2C
i2c:
  id: bus_a
  sda: GPIO22        # XIAO ESP32-C6 D4
  scl: GPIO23        # XIAO ESP32-C6 D5
  frequency: 200kHz
  scan: false        # Set to true temporarily if checking I2C devices


external_components:
  # MAX17048 external component
  - source: github://Option-Zero/esphome-components@max17048
    components: [max17048]


sensor:
  # --- Battery fuel gauge ---
  - platform: max17048
    id: fuel_gauge
    i2c_id: bus_a
    address: 0x36
    update_interval: never

    battery_voltage:
      name: Battery Voltage
      id: batt_v
      unit_of_measurement: "V"
      accuracy_decimals: 3

    battery_level:
      name: Battery Level
      id: batt_pct
      unit_of_measurement: "%"
      accuracy_decimals: 1

    rate:
      name: Battery Discharge Rate
      id: batt_rate
      unit_of_measurement: "%/h"
      accuracy_decimals: 3


  # --- Raw water tank sensor voltage ---
  #
  # This uses ESPHome's built-in ADC platform.
  # GPIO0 reads the analogue voltage from the tank sensor.
  # It is internal because the single raw reading is not shown in Home Assistant.
  # The median value is used instead.
  - platform: adc
    id: tank_raw_voltage
    pin: GPIO0
    attenuation: 12db        # Allows reading higher voltages up to around the ESP32 ADC range. Keep sensor output below 3.3V.
    update_interval: never   # One-shot, triggered at boot
    internal: true


  # --- Median tank raw voltage ---
  #
  # This is published from the on_boot lambda after taking 11 readings.
  # It is internal because depth and tank percentage are the useful Home Assistant sensors.
  - platform: template
    id: tank_raw_median
    internal: true
    update_interval: never


  # --- Depth in metres using calibrate_linear ---
  #
  # Calibration steps:
  # 1) Lift sensor so the sensing part is at the water surface.
  #    Note the raw voltage from the logs. This is your 0.00 m point.
  #
  # 2) Put sensor back in its normal position.
  #    Measure the water depth at the sensor in metres.
  #    Note the raw voltage again.
  #
  # 3) Replace the example numbers below with your real calibration points.
  - platform: template
    id: tank_depth_m
    name: "Tank Depth"
    unit_of_measurement: "m"
    accuracy_decimals: 2
    update_interval: never

    lambda: |-
      return id(tank_raw_median).state;

    filters:
      - calibrate_linear:
          # Replace these with your real calibration points:
          # raw voltage -> water depth in metres
          - 0.025 -> 0.00
          - 0.634 -> 1.09

      # Clamp to your tank height of 2.00 m, or change this to suit your tank
      - lambda: |-
          if (x < 0.0) return 0.0;
          if (x > 2.00) return 2.00;
          return x;


  # --- Tank level as percentage, based on depth ---
  - platform: template
    name: "Tank Level"
    id: tank_level_pct
    unit_of_measurement: "%"
    accuracy_decimals: 0
    update_interval: never

    lambda: |-
      const float tank_height_m = 2.00f;  // Total usable height of the tank in metres
      float d = id(tank_depth_m).state;   // Depth at sensor in metres

      if (d <= 0.0f) return 0.0f;
      if (d >= tank_height_m) return 100.0f;

      return (d / tank_height_m) * 100.0f;


# Deep sleep controller
deep_sleep:
  id: deep_sleep_ctrl
  run_duration: 25s      # How long the device stays awake each cycle
sleep_duration: 30min # Time between readingsBefore you use the code, make sure you:
- Put in your API key
- Set your OTA password
- Update the IP addresses for your network
- Do the sensor calibration (see below)
Deep sleep strategy
The ESP32 spends almost all its time in deep sleep. Every 20 minutes it wakes, does the job, publishes to Home Assistant, and sleeps again. This keeps the average current draw extremely low, which is what makes a small solar panel practical.
If you’re building one of these, treat “wake time” as a real design target. Anything that reduces wake time helps:
- faster Wi-Fi connection
- fewer sensor warm-up delays (within reason)
- efficient filtering and publishing
- avoiding unnecessary boot-time work
ESP32-C6 notes (what to expect)
The ESP32-C6 is newer, and ESPHome support is improving, but it’s not as friction-free as older ESP32 variants yet.
The main pain points for me were:
- ADC behaviour being less straightforward than expected
- Battery monitoring needing more work than usual
To get it stable, I pulled in a couple of external components from GitHub:
- MAX17048 fuel gauge component
- An ADC workaround component to handle C6 limitations
Once that was done, everything behaved properly. Just be aware that if you choose an ESP32-C6 for a low-power sensor build, you may do a bit more troubleshooting than you would with older boards.
(If you want the simplest path, older ESP32 variants can be a smoother experience.)
Filtering the readings (average vs median)
At first I averaged multiple readings. It worked, but every now and then I’d see weird spikes.
Instead, I’m switching to using the median of multiple samples. Median filtering is better at ignoring outliers, which makes the long-term graph cleaner and the level reading more stable.
This is one of those small changes that turns a “prototype that mostly works” into something you can leave running and stop thinking about.

Calibrating the Sensor
A pressure sensor gives you a signal, not a meaningful “litres remaining” number on its own. Calibration is what turns it into a real tank level reading.
I calibrated using three known points:
- Tank empty
- Tank full
- A known midpoint
With those reference points, you map raw voltage (or raw ADC readings) to a real depth value.
If you skip this part or rush it, you’ll end up with a dashboard number that looks impressive but isn’t trustworthy.
Important note: you need to physically change the water level (or move the sensor)
For the “empty / midpoint / full” calibration points to mean anything, the sensor has to see real pressure changes.
That means you must either:
- take readings on days when the tank is genuinely at different levels (near empty, mid, near full), or
- temporarily move the sensor vertically to known depths (for example: lower it 0.5 m, 1.0 m, 1.5 m below the surface)
If you don’t physically change the water height the sensor is measuring, you’ll just record three readings that are basically the same, and the calibration will be wrong, even if the numbers look “smooth” on the dashboard.
How to do the calibration
1) Temporarily disable deep sleep
For calibration, keep the board awake so you can watch live readings.
#      - deep_sleep.enter: deep_sleep_ctrl


# deep_sleep:
#   id: deep_sleep_ctrl
# sleep_duration: 20min2) Open the ESPHome logs
You’ll see values for battery and the raw tank sensor reading.
Battery: 3.819V, Tank raw(avg): 0.842V, Depth: 0.95 m, Tank: 48%3) Take 3 readings at different levels
For each point:
- Measure the real water depth from the water surface down to the sensor (in metres)
- Record the raw sensor reading (voltage or ADC value)
Write them down like this:
- 0.00 m → 0.12V
- 1.00 m → 0.75V
- 2.00 m → 1.40V
4) Enter your values into your calibration mapping
In ESPHome, you can map raw voltage to depth using a linear calibration filter and clamp the output range so it never goes below 0 or above your tank height.
filters:
  - calibrate_linear:
      # Voltage -> Depth (m)  *** use your own values ***
      - 0.12 -> 0.00
      - 0.75 -> 1.00
      - 1.40 -> 2.00
  - lambda: |-
      if (x < 0.0) return 0.0;
      if (x > 2.00) return 2.00;
return x;5) Re-enable deep sleep once it matches reality
When the published depth is sensible and stable, turn deep sleep back on.
      - deep_sleep.enter: deep_sleep_ctrl


deep_sleep:
  id: deep_sleep_ctrl
sleep_duration: 20min # Or however long you wantExternal antenna for better reliability
With the tank outside and the router inside behind multiple walls, I didn’t want to rely on a weak internal antenna. I used an external Wi-Fi antenna and made the changes needed so the ESP32-C6 uses the correct antenna path.
The result:
- a more stable connection
- less time wasted on reconnect attempts
- better reliability overall
- lower power usage (because it connects faster)
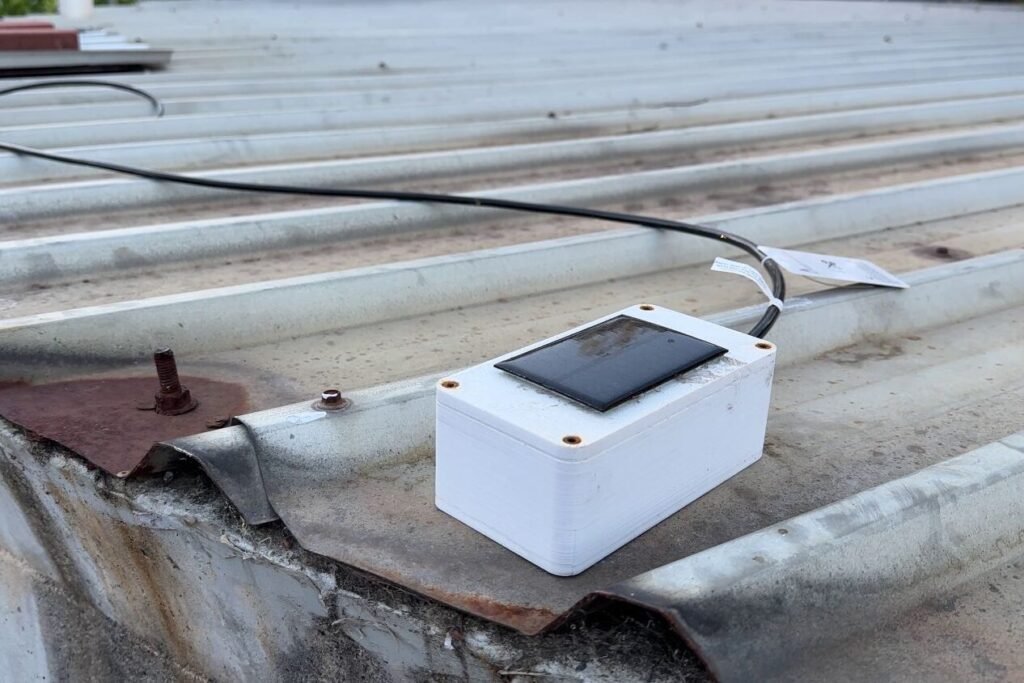
Enclosure and mounting
All electronics live in a 3D-printed enclosure mounted to the tank.
I printed it in white PETG because:
- PETG handles heat better than PLA
- White reflects sunlight instead of soaking it up
You could absolutely use an off-the-shelf weatherproof enclosure too. The key requirements are:
- Weatherproofing
- Secure mounting
- Easy access if you ever need to service it
Real-world results so far
At the time of writing, the system has been running for about two weeks continuously:
- No manual charging
- No intervention
- Battery staying healthy
- Solar panel keeping up comfortably
- Tank readings getting more trustworthy as data builds up
I also added a Home Assistant alert so I get notified if the tank drops below 20%. That’s the real payoff: less checking, more confidence, and enough warning to organise delivery before it becomes urgent.
What’s next: a long-range version with LoRa
Wi-Fi works for this tank because it’s close enough to the house.
I’ve got a second tank much further away, so the next step is building a LoRa version using the same low-power approach, but with a connection that’s designed for distance.
Troubleshooting
Most issues come down to sensor type, calibration, Wi-Fi connection time, or power leakage. These checks cover the common failure points.
- Tank level slowly drifts over days
Check if the sensor is absolute vs gauge. Absolute sensors can shift with weather. If it’s intended to be gauge, confirm the vent/reference path is correct (if applicable). - Random spikes or noisy readings
Increase the number of samples and use median filtering. Take readings when the water is calm (not during pumping/turbulence). Keep analog wiring tidy and away from noisy power lines where possible. - Reading stuck at 0% (or stuck at 100%)
Confirm the sensor is actually being powered during the reading window. Verify the ADC pin and attenuation/range, and make sure the sensor output isn’t exceeding 3.3V (clipping can look like “stuck high”). Confirm the sensor and ESP32 share a common ground. - Battery slowly trends down over time
Wake time is usually the culprit (slow Wi-Fi connects, long delays, frequent updates). Also check the boost converter isn’t leaking current when “off”. Increase sleep duration, shorten wake time, or step up panel/battery size. - Wi-Fi takes ages to connect (or frequently fails)
Try a static IP and check RSSI at the mounting point. If you’ve reduced transmit power too far, reconnect time can get worse. An external antenna often makes a big difference. - Values don’t show up in Home Assistant
Deep sleep devices have a short publish window. Check that Wi-Fi and the API connect during wake, and confirm HA and ESPHome are on networks that can talk to each other (VLAN/guest Wi-Fi can break this). - Depth looks right, but percentage is wrong
Re-check your configured tank height and clamp limits. If your maximum depth doesn’t match your real usable height, the percentage will always be off.
MAX17048 fuel gauge reference
Here’s the Home Assistant Community thread I used for the MAX17048 ESPHome component:
https://community.home-assistant.io/t/adafruit-max17048-lipo-battery-gauge-with-esphome/524005/11
Disclaimer: This project is shared for educational purposes only. If you choose to build it, you do so at your own risk. Double-check wiring, follow safety guidelines, and never work on live circuits if you’re unsure.


I really like the idea of this project you created. I have never played around with home assistant (feel a bit intimidated) or actually built anything since college days (45 yrs ago). I had done a program in Electro-mechanical Engineering. I’d like to implement this idea in my tank to automate my situation, but feeling a bit overwhelmed. I would need a lot of coaching ( hand-holding) to pull this off. We have already exchanged an email describing my thoughts, previously, if recall (yesterday).
Hi John, I do recall you reaching out and I understand what you’re saying, it can be quite a learning curve. In terms of getting Home Assistant set up, there are a couple of easy, ready to go options if you’re not super tech savvy, have a look into Home Assistant Green or Yellow. From my understanding, it should be fairly plug and play with those boxes. I imagine there would also be plenty of resources online to help you along if needed. I would love to make some more videos in the future myself in regards to how to actually set up and use it.
Hi,
Good project
Is it possible to get the whole yaml code?
Regards
hi again, i am very interested to know how do you manage sensor in HA for SOC and voltage of the battery ?
That is to say : how is the yaml code ?
Regards
Hi! I use a history graph as well as a gauge card and tile card to visualise the sensors, I haven’t written any YAML for it (just keeping it simple for now)
Nice project, can you share the yaml code. I will try to copy but with zigbee protocol and IDE
have a nice day
Thank you for the kind words. If you look in the section “ESPHome + Home Assistant integration”, there is a dropdown that will have the code contained in it. Let me know how you go with the zigbee integration, I’m very interested!
I wonder if this would work as a simple high water alarm also. I’m needing an off grid solution and this may work with a different type of sensor, information would only need to be sent if high water trips it.
I think that would be pretty simple to implement, a float sensor/switch would do the trick.
Hi,
Love your project. Thanks very much for taking the time to document it and to post it. I have a similar situation to your with tanks so I am going to give this a go. I am new to this all so please excuse my ignorance. I have one quick question – in respect of the pressure sensor if I follow your link the 0-10v Output is highlighted on the AliExpress website, but your document specifies “In my case: 0-3.3V output and powered from 5V”. If I am to copy your project exactly then do I get the highlighted sensor (0-10v) or the 0-3.3V DC5V?
Steve,
I have done the same thing and brought all the components – on the linked AliExpress site for the sensor, you need to change the options (“colour”) in order to get the 0-3.3V DC5V sensor.
Hey Steve, thank you for the lovely comment. As George said, you’ll need to select the 0-3.3v. It’s a quirk with the AliExpress links, it only directs you to the main product page unfortunately. Let me know how you go with your project and feel free to reach out if you have any issues 🙂
Hi J-Rat,
In attempting to replicate your great project above, I’m running in to the following error while trying to compile the code:
Compiling .pioenvs/water-tank-sensor/src/esphome/components/c6_adc/c6_adc.cpp.o
In file included from src/esphome/components/c6_adc/c6_adc.cpp:2:
src/esphome/components/c6_adc/c6_adc.h:6:10: fatal error: esp_adc/adc_oneshot.h: No such file or directory
6 | #include “esp_adc/adc_oneshot.h”
| ^~~~~~~~~~~~~~~~~~~~~~~
compilation terminated.
*** [.pioenvs/water-tank-sensor/src/esphome/components/c6_adc/c6_adc.cpp.o] Error 1
========================= [FAILED] Took 22.63 seconds ========================
Any thoughts on the matter would be greatly appreciated.
Hi George, that error usually happens when your ESPHome/PlatformIO toolchain is out of date, so it’s missing esp_adc/adc_oneshot.h.
To fix it, update to the latest ESPHome (and PlatformIO if you compile locally), then delete the .pio/.pioenvs build folders and recompile. Also make sure your ESP32-C6 build is using ESP-IDF (not Arduino). Let me know how you go!
Thanks for getting back to me. This is my first ESPHome project, so I appreciate the advice. I’ve installed the latest version of ESPHome builder on Home Assistant, and since posting here initially, have removed and reinstalled it. I’ve “cleaned all build files’ and “cleaned all files” in ESPHome builder as well.
I’m using your code verbatim (other than changing !secrets etc), and I get the following notification during the install process, which suggests the software is up to date?
Creating a new virtual environment for IDF Python dependencies using uv
Using Python 3.12.10 environment at: /root/.platformio/penv/.espidf-5.5.2
Installing ESP-IDF’s Python dependencies with uv
Using Python 3.12.10 environment at: /root/.platformio/penv/.espidf-5.5.2
Unfortunately, it is still failing with the same adc.oneshot error. Your further thoughts or suggestions are most welcome.
Hi George,
I am getting exactly the same error as you. Have re-installed, upgraded etc but can’t seem to resolve it. Did you manage to fix it ?
Would really appreciate any assistance if you did
thanks
Steve
Hi Steve and George,
I’ve adjusted the code to remove the part that was causing the issue.
Let me know if it works for you now 🙂
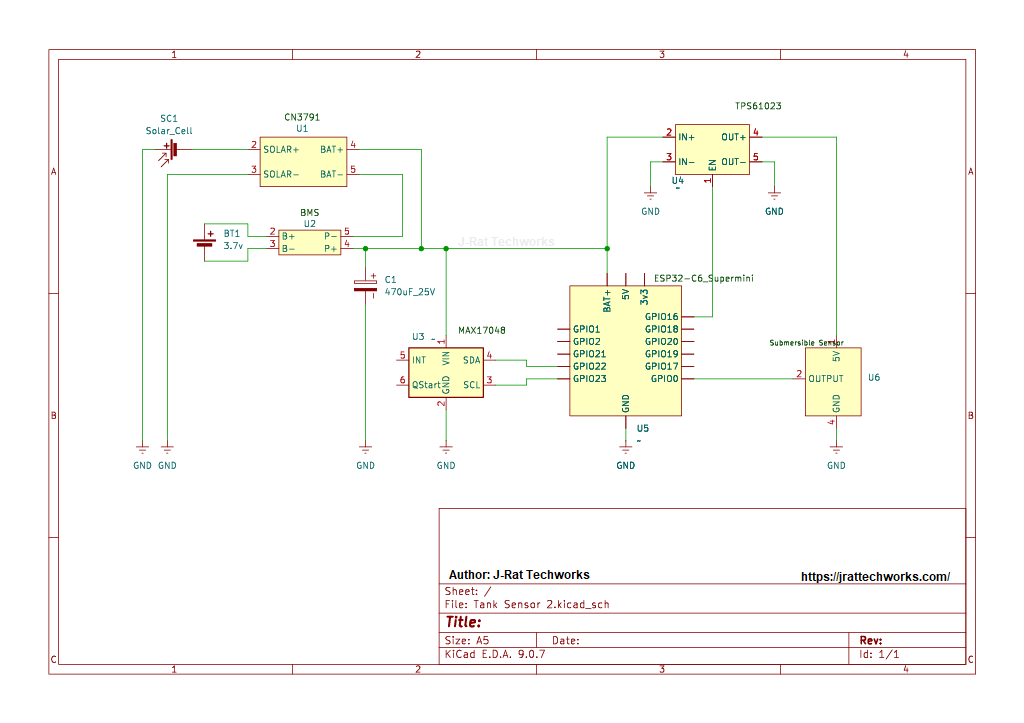
Hi, great project and thanks for the instructions. This is my first time on the esp32 / electronics side of things. I’ve bought the components and trying to work out how to connect the TSP61023 to the rest of the setup…
On your diagram you have connections 1,2,3,4,5 but the board has Vin, GND, 5V, En. Looking at your chip it looks the same, but I can’t work out which is which and is the 5th connection the large hole in the top left of the chip?
Many thanks
Hi David,
Thanks for reaching out, and sorry that part of the diagram was not very clear.
On the TPS61023 board, the two ground connections in my diagram, 3 (IN-) and 5 (OUT-), are both the same ground. On the actual board, you only need to use the pin labelled GND, since they are tied together internally.
The large hole is just a mounting hole, not an electrical connection.
So for your setup, you will only use 4 wires to connect to the TPS61023: VIN, GND, 5V and EN.
I hope that clears things up for you.
Could you give me some detail on the adc work around from github as I’m getting this
src/esphome/components/c6_adc/c6_adc.h:6:10: fatal error: esp_adc/adc_oneshot.h: No such file or directory.
Hi Andrew, I’ve adjusted the code to what I am currently using on my own tank sensor after a few iterations. A lot of people seem to be having issues with the adc work around so I have removed it.
Let me know if you have any other issues 🙂
This is really neat and will make a great replacement for my broken ultrasonic Tuya sensor. One question: I have a power outlet about 5 feet from my water tank. In that use case can I just run power to not have to worry about the solar setup or is there another overriding reason for the solar setup.
Hi there, your power outlet will be more than fine to use. I used solar only because I didn’t want it restricted to the outlet!
Hi I love this project great work. I see you did mention you will look into a Lora version. Is this still something you might do as I would like to follow that project.
Thank you, I appreciate it. I do still plan to do the Lora version, I don’t have a timeframe as to when it will be completed though unfortunately
Great work! I’d love to see a LoRa version too when you get to it,.