If you’ve got a couple of smart bulbs, a plug or two and maybe a random Wi-Fi camera, you’ve probably already hit the point where juggling five different apps is just annoying.
That’s where Home Assistant comes in.
Home Assistant is an open-source smart home platform that runs on your own hardware and pulls everything into one place – lights, plugs, sensors, cameras, speakers and more. It focuses on local control and privacy, and it supports thousands of devices and integrations across Zigbee, Z-Wave, Wi-Fi, Thread, Matter and more.
In this guide I’ll walk you through:
- What Home Assistant actually is (in normal language)
- What hardware you need
- The simplest way to install it
- Adding your first devices
- Building basic automations and a clean dashboard
- How to handle backups and avoid common beginner mistakes
By the end, you should have a basic but usable Home Assistant setup – not a perfect one, just something that works and you can build on.
Some of the links in this post may be affiliate links. If you buy through them, I may earn a small commission at no extra cost to you.
What Is Home Assistant?
The short version
Home Assistant is the “brain” of your smart home.
Instead of each device living in its own app, Home Assistant sits in the middle and talks to all of them. That means:
- One dashboard instead of five different apps
- Automations that combine different brands and devices
- Control that doesn’t fall over the second your internet has a bad day
You run it on a small computer in your house (or a dedicated box like Home Assistant Green), and you access it via a browser or the Home Assistant mobile app.
Why not just use the manufacturer apps?
You can just use the apps that come with your devices, but you’ll hit limits pretty quickly:
- Too many apps – lights in one, plugs in another, blinds in a third
- Cloud dependency – if the vendor’s cloud is down, your devices can be useless
- Limited automations – you might be able to do “turn on at 7pm”, but not “if it’s after sunset and I’m home and the living room is under 200 lux, turn this specific lamp on to 30%”
- Lock-in – some ecosystems are great… until you want to add something they don’t support
Home Assistant solves that by:
- Pulling your devices into one interface
- Doing as much as possible locally on your network
- Letting you build automations that mix and match brands and protocols
| Without Home Assistant | With Home Assistant |
|---|---|
| 4-5 different apps | One main dashboard |
| Basic “timer” style automations | Complex automations across brands and rooms |
| Cloud-only control for many devices | Local control wherever possible |
| Hard to see everything at a glance | Single view of lights, plugs, sensors and energy usage |
What You Need Before You Start
You don’t need a full server rack to run Home Assistant. You just need one device that can stay on 24/7 and a basic home network.
Hardware options (pick one)
Option 1: Home Assistant Green / Yellow (easiest)
- Pre-built box from the Home Assistant team
- Home Assistant comes pre-installed
- Plug it into power and your router, do a quick setup, and you’re off
Option 2: Raspberry Pi or similar single board computer
- Good budget option if you already own one
- You flash an image to an SD card (or SSD), plug it in and install Home Assistant OS
- Slightly more DIY, but still very beginner-friendly
Option 3: Mini PC / NAS / small server
- Great if you already run a home server, NAS or something like a ZimaBlade or NUC
- More powerful, better for running extra stuff (media server, containers, etc.)
- You’ll usually run Home Assistant in Docker or a VM here
If you just want to get started with the least drama, I’d recommend:
Beginner recommendation:
Use Home Assistant OS on either a Home Assistant Green or a Raspberry Pi.
Other basics
You’ll also need:
- A home router with Wi-Fi
- A laptop or desktop to do the first setup
- At least one or two smart devices ready to connect:
- A Wi-Fi smart plug
- A smart bulb
- Or a simple Zigbee device if you already have a Zigbee hub / stick
Choosing How to Install Home Assistant
There are a few different installation types, which is where a lot of beginners get overwhelmed. Let’s keep it simple.
The main install types
- Home Assistant OS
- Full operating system dedicated to Home Assistant
- You flash it to an SD card/SSD and it manages everything for you
- Best option for most beginners
- Home Assistant Container (Docker)
- Runs inside Docker on an existing Linux server or NAS
- Good if you’re already comfortable with Docker and want more control
- Home Assistant Core
- Installed directly via Python on an existing OS
- More advanced, more manual setup, not what I’d recommend for your first time
My recommendation for beginners
If you’re new to Home Assistant, use Home Assistant OS on a dedicated device.
It gives you:
- Easier updates
- Built-in backup tools (which got a big overhaul in early 2025)
- Access to add-ons and the Supervisor interface
Step-by-Step: Installing Home Assistant
This isn’t meant to replace the official docs, but it’ll give you a clear overview of what’s happening so you’re not flying blind.
1. Flash Home Assistant OS to your device
- Go to the official Home Assistant installation page.
- Download the correct image for your hardware (e.g. Raspberry Pi 4).
- Use a tool like balenaEtcher or Raspberry Pi Imager to flash the image to:
- An SD card (for Pi), or
- An SSD if your board supports booting from it (recommended for reliability).
2. First boot and finding Home Assistant
- Put the SD/SSD in your device.
- Plug it into:
- Power
- Your router via Ethernet (Wi-Fi can be configured later)
- Wait a few minutes – it can take 5-10 minutes on the first boot.
- On a computer on the same network, open a browser and try:
http://homeassistant.local:8123
- Log into your router
- Look for a device called “homeassistant” or similar and grab the IP address
- Visit
http://YOUR.IP.ADDRESS:8123
Once it’s ready, you’ll see the Home Assistant onboarding page.
3. Create your user account
Home Assistant will walk you through:
- Creating a username and password
- Giving your system a name (e.g., “Home”, “J-Rat HQ”)
- Choosing your location and units
This first account is the admin, so pick a password you’ll remember but that isn’t trivial.
First-Time Setup: Basic Configuration
The onboarding wizard
During onboarding you’ll be asked for:
- Location & time zone – for sunrise/sunset automations and weather
- Units – for most of us, that’s:
- °C
- Metric
- 24-hour time
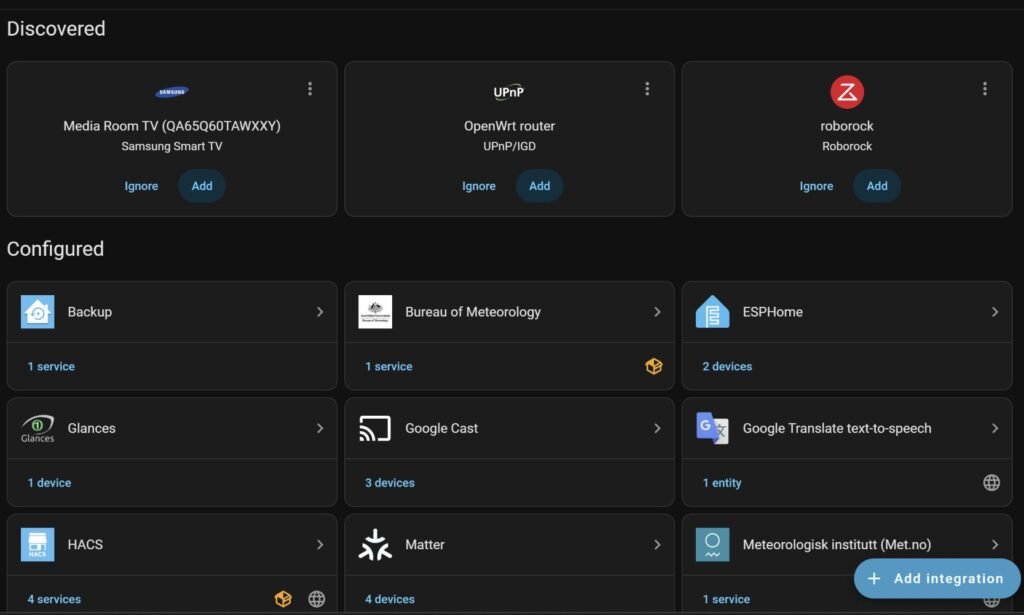
Adding auto-discovered devices
Home Assistant is pretty good at spotting things already on your network. After the first boot, you’ll often see pop-ups like:
“New device discovered: TP-Link Tapo”
“New device discovered: Chromecast”
You can:
- Click Configure on one of these
- Log in or add any required details (e.g. username/password for a cloud account)
- Let Home Assistant pull in your devices
This is an easy way to add your first few things without hunting through menus.
Understanding the Home Assistant Interface
Once you’re in, the UI can feel a bit busy. Here’s the high-level view.
Main parts of the UI
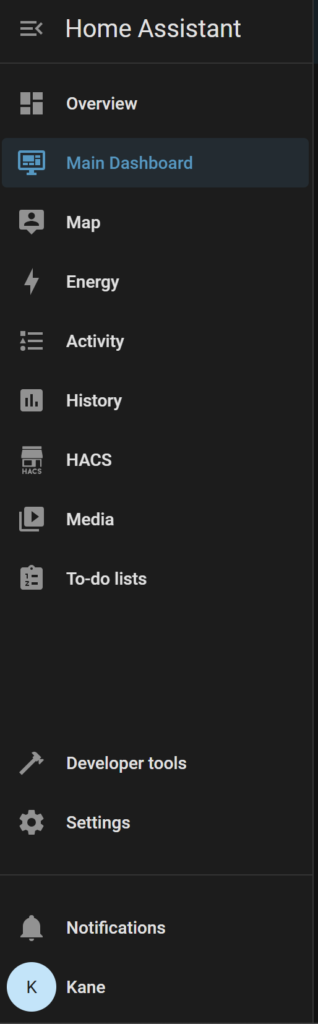
- Sidebar (left) – navigation:
- Overview – your main dashboard
- Map, Logbook, History – optional bits you can explore later
- Settings – where devices, automations and system options live
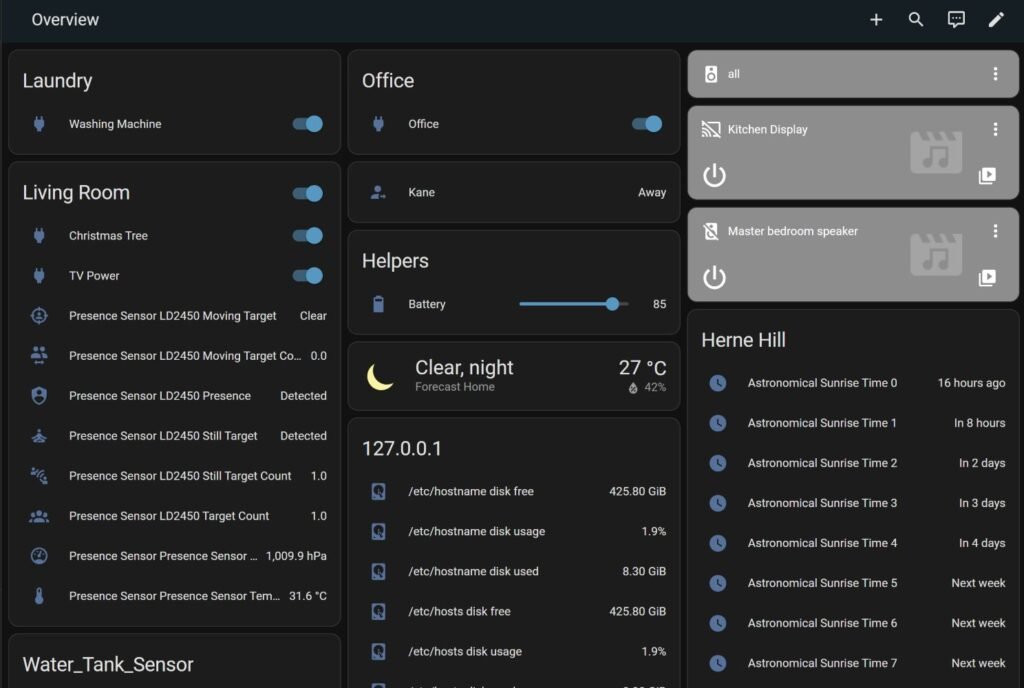
- Overview
- The default dashboard with cards for lights, plugs, sensors etc.
- You can have multiple dashboards later (e.g. “Main”, “Wall tablet”, “Energy”).
- Settings → Devices & Services
- Where integrations live (TP-Link, Philips Hue, ESPHome, etc.)
- Each integration contains one or more devices
- Each device exposes one or more entities (e.g. a plug entity with power monitoring) Michael Leen
Lightly customising the default dashboard
To stop things feeling messy:
- Go to Overview
- Click the three dots (⋮) in the top right → Edit dashboard
- Remove any cards you don’t care about
- Add a simple Entities card with:
- Your first smart plug
- One or two lights
- Maybe a temperature sensor
This gives you a “daily driver” card without noise.
Adding Your First Devices (Lights, Plugs, Sensors)
Let’s get some actual hardware into Home Assistant.
Wi-Fi smart plugs and bulbs
Most Wi-Fi devices fall into two categories:
- Local integrations (Shelly, some Tapo/Kasa models, ESPHome, etc.)
- Cloud-linked integrations (where you log in with your vendor account)
To add a typical Wi-Fi plug:
- Make sure the plug is set up and working in its own app
- In Home Assistant go to Settings → Devices & Services
- Click + Add Integration
- Search for your brand (e.g. “Tapo”, “Kasa”, “Shelly”)
- Follow the prompts – usually logging into the account or providing the device IP
Once added, you’ll see:
- A device for that plug
- One or more entities:
- The main switch
- Possibly energy monitoring (power, voltage, current, kWh)
Zigbee / Thread devices
If you want to use Zigbee sensors and bulbs (Philips Hue, IKEA, Aqara, Sonoff, etc.), you’ll need:
- A Zigbee coordinator (USB stick or hub)
- Or a hub that Home Assistant can talk to (e.g. a Hue Bridge)
Popular options include:
- ZHA (built-in Zigbee integration)
- Zigbee2MQTT (more advanced, via an add-on)
ESPHome / DIY devices
If you like tinkering with ESP32 boards (like the ESP32-C3, XIAO, etc.), you can:
- Flash them with ESPHome
- Add custom sensors (temperature, mmWave presence, water tank levels, etc.)
- Have them show up in Home Assistant like any other device
I won’t dive into the full ESPHome flow here, that deserves its own guide, but just know that Home Assistant is very DIY-friendly.
Automations for Beginners: Make Your First “Smart” Thing
Automations are where Home Assistant really starts to shine.
At a basic level, every automation is:
Trigger → (optional) Condition → Action
The basic automation recipe
- Trigger – what starts the automation
- Example: Sun sets, motion detected, time is 10pm, phone leaves home
- Condition – optional filters
- Example: Only if people are home, only if it’s after sunset, only if a light is currently off
- Action – what actually happens
- Example: Turn on a light, turn off a plug, send a notification
Example 1 – Turn a lamp on at sunset
Goal: Turn on a smart plug or lamp automatically when the sun goes down.
- Go to Settings → Automations & Scenes
- Click + Add Automation
- Choose “Create new automation”
Set it up like this:
- Trigger
- Type: Sun
- Event: Sunset
- Condition (optional)
- Type: Person or Zone
- Condition: Only run if someone is home
- Action
- Type: Device
- Choose your smart plug or light
- Action: Turn on
Now at sunset, your lamp turns on by itself.
Example 2 – Turn a light off after no motion for 5 minutes
Goal: If the room is empty, turn the light off to save power.
- Trigger
- Type: State
- Entity: your motion sensor
- From: “detected” (or “on”)
- To: “clear” (or “off”)
- For: 5 minutes
- Condition (optional)
- Only if the light is currently on
- Action
- Type: Device → select your light
- Action: Turn off
These two simple automations already make your setup feel a lot smarter.
Creating a Simple, Clean Dashboard
It’s tempting to show everything on your main dashboard. That’s usually a mistake.
Decide what actually needs to be on the main screen
Ask yourself:
- What do I touch every day?
- What do I need to see at a glance?
For most people, the main dashboard only needs:
- A small set of key lights and plugs
- A few useful sensors (indoor temp, humidity, maybe energy usage)
- A quick shortcuts section (e.g. “All lights off”, “Goodnight”)
Build a “daily driver” dashboard
- Go to Overview → three dots (⋮) → Edit dashboard
- Add:
- An Entities card with your most-used switches and lights
- A Glance card with a few sensors (temperature, humidity, energy)
- Move or delete the auto-generated cards you don’t care about
Later, you can add:
- A dedicated Energy dashboard
- A Wall tablet dashboard with big buttons
- A Room-based dashboard (e.g. tiles for Living, Bedroom, Office)
Mobile vs desktop
The default dashboards are responsive, so:
- Design as if you’re using a phone first
- Keep rows short and simple
- Use icons and clear names (“Living Lamp – Kane Side” is better than “Plug4”)
Backups and Not Breaking Things
Home Assistant’s backup system got a big upgrade in 2025 – which is perfect for beginners because it’s now much easier to automate and store backups safely.
Enable and understand backups
In Settings → System → Backups you can:
- Create a full or partial backup (your config, add-ons, etc.)
- Store backups locally, or in Cloud for paid Home Assistant Cloud users
- Set up backup locations and retention rules (keep X backups, delete older ones)
The short version:
Before any big change (new hardware, major version update, big integration), make a backup.
Updating Home Assistant safely
Updates are important – they add features, bug fixes and security improvements. Just don’t hit “update all” at 11pm and then go to bed.
A safer pattern:
- Check the release notes or community posts for your version
- Make a backup
- Run updates when you have at least a bit of time to fix things if needed
Common Beginner Pitfalls (And How to Avoid Them)
Here are some easy traps to avoid.
1. Running off a terrible SD card
Cheap, no-name SD cards will eventually corrupt and take your setup with them.
- Use a decent brand (SanDisk, Samsung, etc.)
- Or better yet, boot from an SSD if your hardware supports it
2. Dumping every entity onto the dashboard
By default, you might end up with:
- Every sensor
- Every light
- Every diagnostic entity
Instead:
- Hide entities you don’t care about from the main dashboard
- Create a separate “Nerd” dashboard later if you want everything visible
3. Not naming things properly
If everything ends up as plug_93719 and light.kitchen_2, you’ll hate yourself in a month.
Try:
Living Lamp - LeftOffice - Desk PlugBedroom - Kane Lamp
4. Overcomplicating automations too early
Start simple:
- One trigger, one action
- Maybe a single condition
You can always turn it into a more complex automation later once you trust the basics.
5. Relying only on cloud integrations
Where you can, prefer:
- Local APIs
- Local-friendly brands (Shelly, ESPHome, Zigbee gear, etc.)
Cloud-only devices are fine, but if their servers go down, your automations might break.
Tip: When choosing new smart devices, quickly check if there’s a Home Assistant integration for them first.
Where to Go Next
Once you’ve got a basic setup with a few devices and automations working, there are a few natural next steps.
Learn more about devices and integrations
Things you can explore next:
- Zigbee vs Wi-Fi vs Thread vs Matter
- Energy-monitoring smart plugs and how to track usage in Home Assistant
- Presence detection (phones, routers, Bluetooth, mmWave sensors)
Dive into DIY projects
If you’re into DIY and microcontrollers, Home Assistant works really well with:
- ESPHome on ESP32/ESP8266 boards
- Custom sensors like:
- Temperature and humidity
- Water tank level
- mmWave presence detection for rooms
- Outdoor environment sensors
You can build your own devices, flash them with ESPHome, and have them show up neatly inside Home Assistant alongside your commercial gear.
Wrap-up
Home Assistant can look intimidating at first glance, but you don’t need to learn everything on day one.
If you do nothing else after reading this, try just this:
- Install Home Assistant on one device
- Add one smart plug or light
- Create one simple automation
- Example: turn on a lamp at sunset
Once that’s working reliably, you can slowly add more devices, more automations and nicer dashboards over time.
If you’d like a follow-up guide on any specific part (ESPHome, Zigbee, dashboards, presence detection, energy monitoring, etc.), let me know – that’ll probably be the next blog I write.