If you’ve ever had your smart lights or plugs turn off the second you get comfortable on the couch, you’ve hit the limits of a basic PIR sensor.
That was my living room for a while. A standard PIR motion sensor was controlling the smart plug for our Christmas tree through Home Assistant. As soon as there was no obvious movement, it decided the room was empty and shut everything off, even if we were still sitting right there.
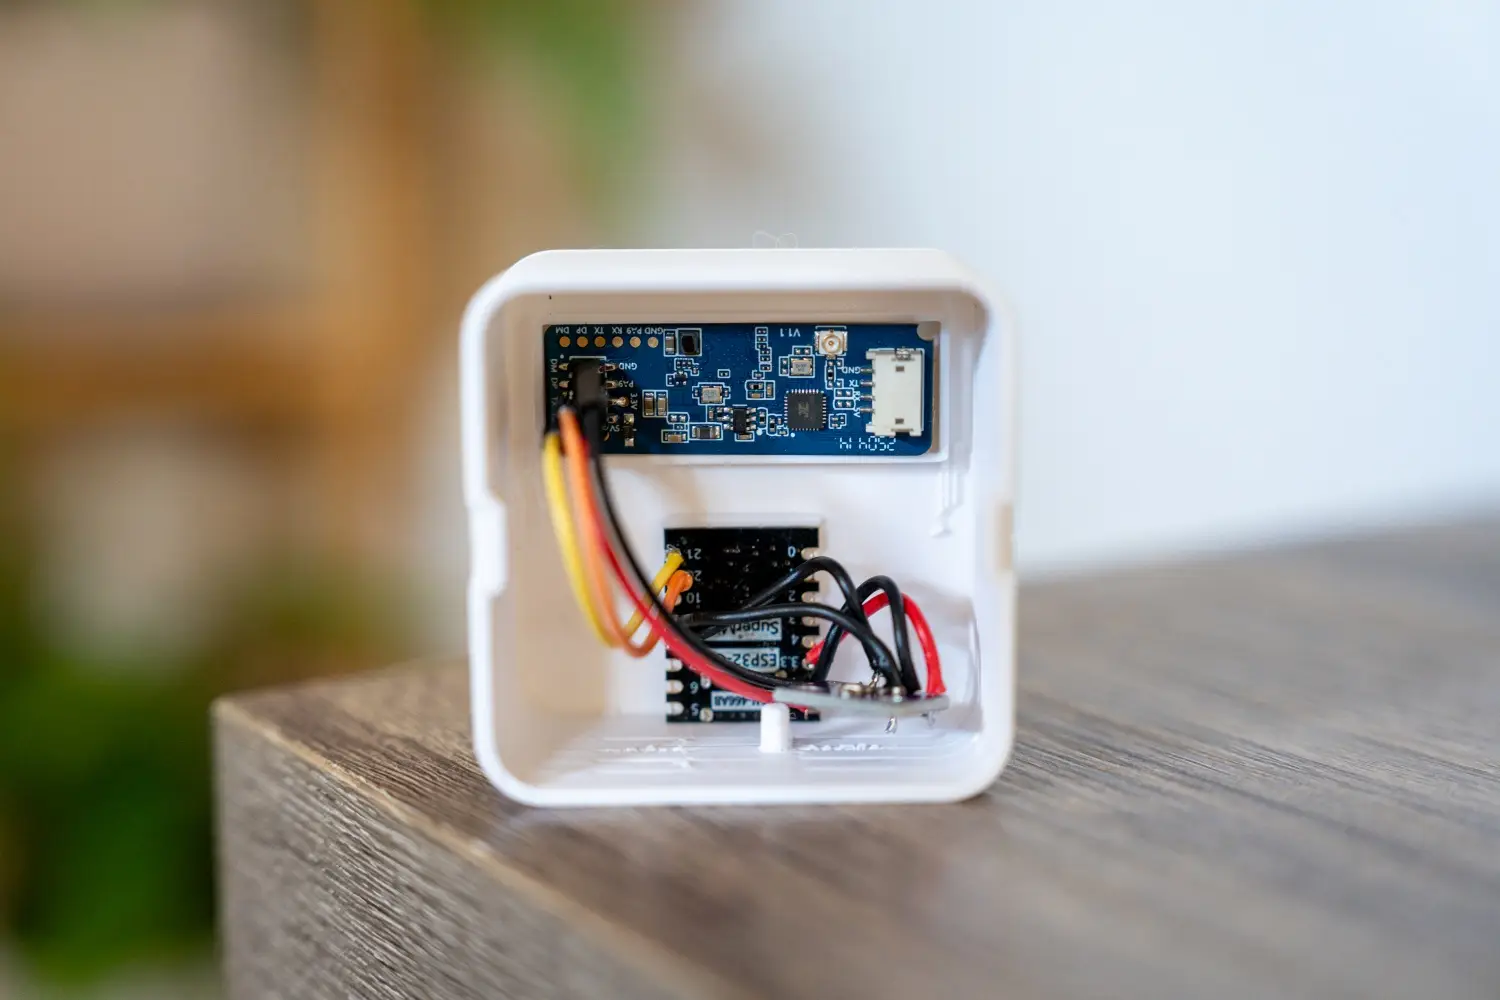
To fix it properly, I built a mmWave presence sensor for Home Assistant using an HLK-LD2450 mmWave radar and an ESP32-C3 running ESPHome. Now the tree (or anything else I attach to the automation):
- Turns on when someone walks into the room
- Stays on while people are sitting fairly still
- Turns off a few minutes after the room is genuinely empty
This post walks through the whole build so you can reuse the same mmWave radar presence detection in your own setup.
Quick disclaimer: This project involves mains-powered devices and DIY electronics. Double-check your wiring, follow your local electrical rules, and make changes at your own risk.
Some of the links in this post may be affiliate links. If you buy through them, I may earn a small commission at no extra cost to you.
What We’re Building
At a high level, this project is a small DIY Home Assistant presence sensor that sits in your living room and reports presence to Home Assistant much more reliably than a PIR.
The stack looks like this:
- HLK-LD2450 mmWave sensor for presence
- ESP32-C3 Supermini running ESPHome
- Home Assistant for automations
- A smart plug (in my case, a Tapo P110M) to control the Christmas tree
You can treat it as a template for a whole range of mmWave sensor automations – lights, media, climate, or anything that should depend on whether people are actually in the room.
PIR vs mmWave Sensor: Why Bother Upgrading?
Most affordable motion sensors in smart homes are PIR sensors (passive infrared). They’re great at one thing: noticing changes in heat.
- You walk into the room → the infrared pattern changes → PIR fires
- You stop moving → after a timeout, it assumes nobody’s there
In hallways or bathrooms, that’s fine. In a living room, office, or bedroom, it’s not ideal. “Sitting still for 10 minutes” and “leaving the room” look exactly the same to a PIR.
How the HLK-LD2450 mmWave Sensor Works
The HLK-LD2450 works completely differently. It’s essentially a radar motion sensor for Home Assistant projects:
- It sends out radio waves and listens for reflections
- It can detect very small movements – shifting on the couch, fidgeting, subtle body motion
- It separates moving and still targets
- It can report a target count (how many objects it sees)
In a typical LD2450 Home Assistant setup via ESPHome, you get sensors for:
- Overall presence (detected / not detected)
- Moving target state and count
- Still target state and count
- Total targets
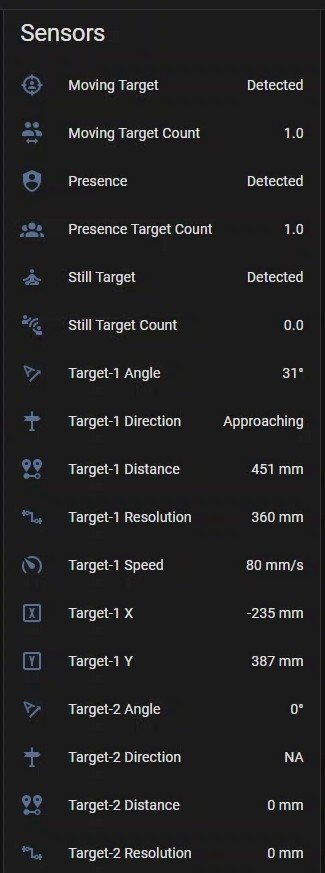
For this build, I mostly rely on the simple binary presence sensor, but those extra values are handy for testing and future mmWave sensor automation ideas.
Presence Detection Without Cameras
Another nice side effect: this sort of smart presence detection doesn’t need a camera.
- No video
- No microphone
- No images stored anywhere
You get a much smarter presence signal than a PIR, without pointing a camera at your couch.
Parts List (What I Used)
This is a fairly simple ESP32 Home Assistant project. Here’s the hardware I used in my build:
Core components
- HLK-LD2450 mmWave radar module
- Handles all of the presence detection
- Talks to the ESP32 over UART
- ESP32-C3 Supermini
- Tiny board with built-in USB
- Cheap and widely available
- Runs ESP32-C3 ESPHome very nicely
Optional sensor
- BMP280 temperature/pressure sensor
- Connected over I2C
- Included mostly because I had it on hand
- Reads warmer than the actual room because it lives inside the enclosure with warm electronics
Power and case
- USB power supply (always on)
- 3D-printed enclosure to hold the boards and point the radar at the room
Since this mmWave presence sensor works perfectly through plastic, you don’t need a special window in the enclosure, just avoid metal or overly thick walls.
No 3D Printer?
You don’t need a 3D printer to get this running. A few simple options:
- Screw the boards to a small piece of perfboard or a prototype stand
- Put everything in a generic plastic junction box
- Sit the boards on top of a shelf where they have a clear view of the room
The important stack is:
- HLK-LD2450 mmWave sensor
- ESP32-C3 running ESPHome
- Home Assistant listening for presence
Everything else is just packaging.
Wiring the HLK-LD2450 and ESP32-C3
The wiring is straightforward, but because the boards are small it’s worth being careful.
HLK-LD2450 → ESP32-C3 (UART)
The LD2450 communicates with the ESP32-C3 over UART.
Typical connections:
TX(LD2450) →RXpin on ESP32-C3RX(LD2450) →TXpin on ESP32-C35V→ 5V supplyGND→ Ground
In ESPHome, you’ll configure the UART component to use those same ESP32 pins.
BMP280 (I2C)
The BMP280 connects over I2C and runs at 3.3V:
3.3V→ 3v3 on ESP32-C3GND→ GroundSDA→ I2C data pin on ESP32-C3SCL→ I2C clock pin on ESP32-C3
You’ll reference those pins in the I2C section of your ESPHome config.
Wiring Gotchas I Ran Into
A few things that cost me time:
- I used the wrong I2C pins in ESPHome at first, so the BMP280 never showed up
- I put ground on the wrong pin on the radar module once, which made everything look dead
- An earlier BME sensor saw 5V instead of 3.3V and didn’t survive
The short version: keep the ESP32-C3 pinout and each sensor’s pinout in front of you, and make sure your ESPHome config matches how it’s actually wired.
ESPHome Configuration for the LD2450 Node
On the firmware side, this project is just an ESP32-C3 ESPHome node that exposes the LD2450’s data to Home Assistant.
At a high level, the YAML does four things:
- Defines the ESP32-C3 board and Wi-Fi connection
- Sets up UART and the HLK-LD2450 mmWave sensor
- Sets up I2C and the BMP280 (optional)
- Exposes everything as sensors and a binary sensor for presence
Here’s a simplified example of what the ESPHome config might look like:
esphome:
  name: ld2450_living_room

esp32:
  board: esp32-c3-dev
  framework:
    type: arduino

wifi:
  ssid: !secret wifi_ssid
  password: !secret wifi_password

logger:

api:

ota:

uart:
  id: uart_ld2450
  tx_pin: GPIO21   # update to your wiring (ESP32-C3 GPIOs vary by board)
  rx_pin: GPIO20   # update to your wiring
  baud_rate: 256000

ld2450:
  uart_id: uart_ld2450
  id: living_room_ld2450

binary_sensor:
  - platform: ld2450
    ld2450_id: living_room_ld2450
    presence:
      name: "Living Room Presence"

sensor:
  - platform: ld2450
    ld2450_id: living_room_ld2450
    moving_target_count:
      name: "Living Room Moving Targets"
    still_target_count:
      name: "Living Room Still Targets"
    total_target_count:
      name: "Living Room Total Targets"

i2c:
  sda: GPIO8       # update to your wiring
  scl: GPIO9
  scan: true

# Optional: BMP280
# sensor:
#   - platform: bmp280
#     address: 0x76
#     temperature:
#       name: "Living Room Enclosure Temperature"
#     pressure:
#       name: "Living Room Enclosure Pressure"
#     update_interval: 30s
Adjust the pins to match your wiring, and you’ve got a solid mmWave presence sensor for Home Assistant.
Once you flash this and bring the node online, Home Assistant should see:
binary_sensor.living_room_presence- Moving / still / total target sensors
- Optional temperature/pressure from the BMP280
Note: Because the BMP280 is inside the enclosure with the ESP32 and radar, it usually reads a few degrees warmer than the actual room. For a “real” room temperature sensor, mount it somewhere more exposed.
Home Assistant Automations Using the mmWave Presence Sensor
With ESPHome up and running, everything else happens in Home Assistant. I’m using a Tapo P110M smart plug for the Christmas tree, but the same idea works for any light, switch, or scene.
Instead of writing YAML, I built the logic using Home Assistant’s automation editor (the “When / And if / Then do” interface). I ended up with two simple automations: one to turn the tree on, and one to turn it off again.
Basic Automation Logic in the Visual Editor
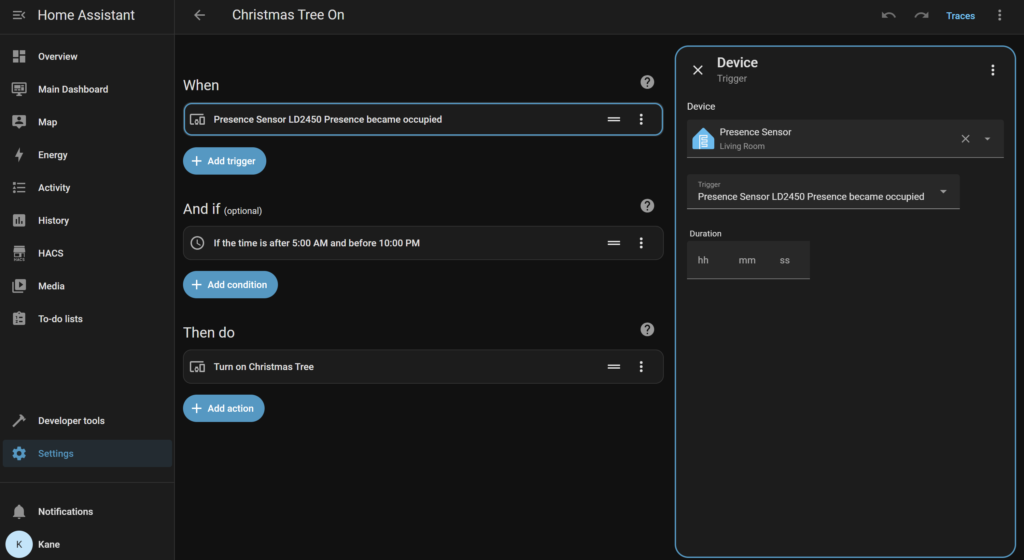
1. Turn the tree on when presence is detected
Automation name: Christmas Tree On
In the automation editor:
- When
- Trigger type: Device
- Device:
Presence Sensor (Living Room) - Trigger:
Presence Sensor LD2450 Presence became occupied - No duration – it fires as soon as the mmWave presence sensor flips to “occupied”.
- And if (optional conditions)
- Condition type: Time
- “If the time is after 5:00 AM and before 10:00 PM”
- This stops the tree turning on in the middle of the night when someone walks through the room.
- Then do
- Action type: Device
- Device:
Christmas Tree(the Tapo P110M smart plug) - Action:
Turn on Christmas Tree
Whenever the HLK-LD2450 mmWave presence sensor detects someone in the living room during that time window, Home Assistant turns the tree on automatically.
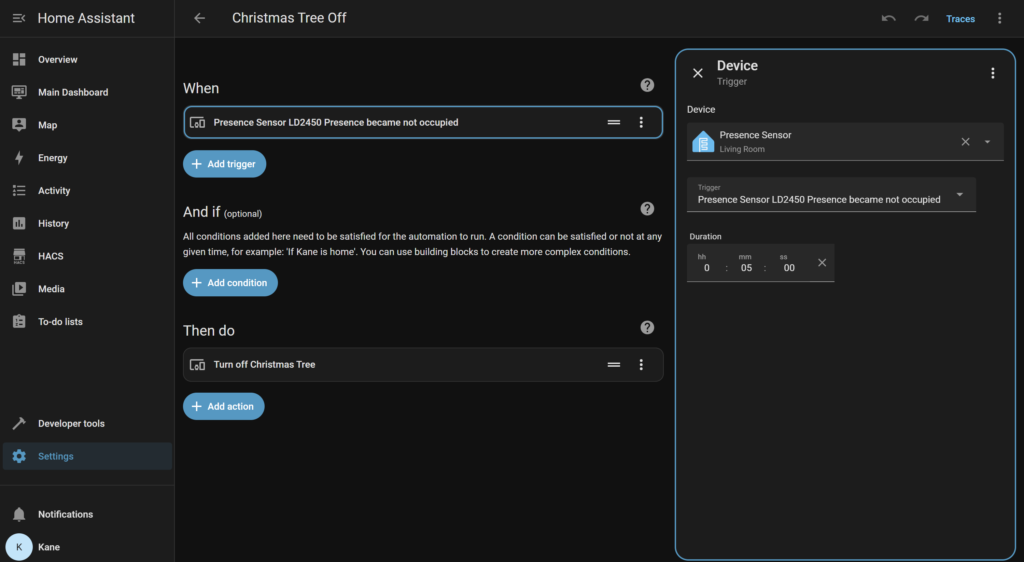
2. Turn the tree off after the room has been empty for 5 minutes
Automation name: Christmas Tree Off
In the second automation:
- When
- Trigger type: Device
- Device:
Presence Sensor (Living Room) - Trigger:
Presence Sensor LD2450 Presence became not occupied - Duration:
00:05:00 - This means the trigger only fires if the room has been “not occupied” for a full five minutes.
- And if
- No extra conditions – this can run at any time.
- Then do
- Action type: Device
- Device:
Christmas Treesmart plug - Action:
Turn off Christmas Tree
In practice, this setup gives you exactly what you want from a mmWave presence sensor Home Assistant automation:
- The tree turns on when someone walks into the living room (but only between 5 am and 10 pm).
- It stays on while people are actually there, even if they’re fairly still on the couch.
- Once the mmWave radar presence detection reports “not occupied” for five minutes, Home Assistant turns the tree off for you.
Because these are just standard device automations, you can still manually switch the plug on or off in the UI whenever you like – the presence logic simply layers on top to keep things automatic.
Other Automation Ideas
Once you’ve got reliable mmWave radar presence detection, you can expand this node to control more than just a tree:
- Dim or turn off living-room lights at night when there’s no presence
- Pause media or turn off the TV when the room sits empty for a while
- Feed presence into “Night mode” or “Away mode” scenes
- Combine presence with time-of-day and target counts to behave differently when there’s one person vs a group
This is where the PIR vs mmWave sensor difference really shows. Instead of guessing based on motion, you’re working with proper presence.
Using the HLK App as a Visualiser
Before I called the hardware “done”, I connected the radar to the HLK app to check positioning.
The app gives you a simple “map” showing targets in front of the sensor. It’s surprisingly useful to:
- Confirm the couch and main seating areas are in the detection zone
- Check how far the sensor reliably sees in your room
- Make sure the enclosure and mounting angle aren’t blocking anything
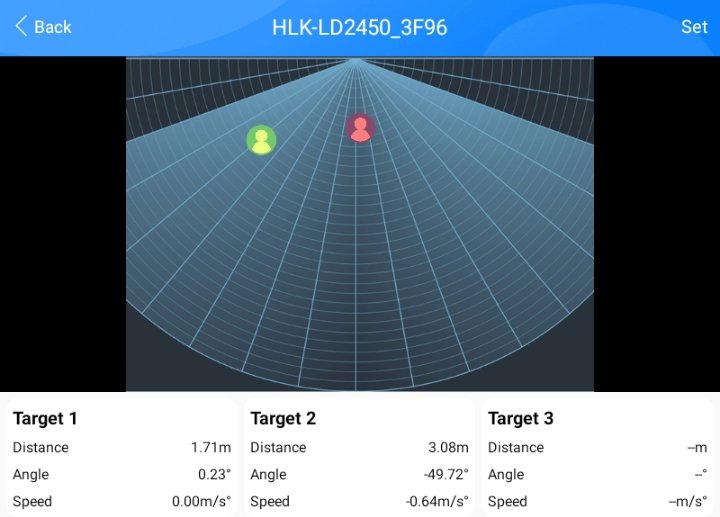
I treated it as a sanity check:
- Sit on the couch → see myself on the map
- Move around → watch the target move
- Step out of view → make sure presence drops
Once I was happy with that, I let ESPHome + Home Assistant handle everything.
Real-World Behaviour and Placement Tips
In everyday use, the node has been pretty well behaved.
A few things I’ve noticed:
- I haven’t seen many false positives where presence is “on” with no-one in the room
- A fan in the sensor’s field of view can cause occasional flickers, so keep that in mind if you’ve got ceiling fans or pedestal fans nearby
- Within its main detection cone, it does a great job of keeping the room “occupied” while people are actually there
Mounting Height and Angle
Official docs for the LD2450 suggest mounting around chest height for best performance.
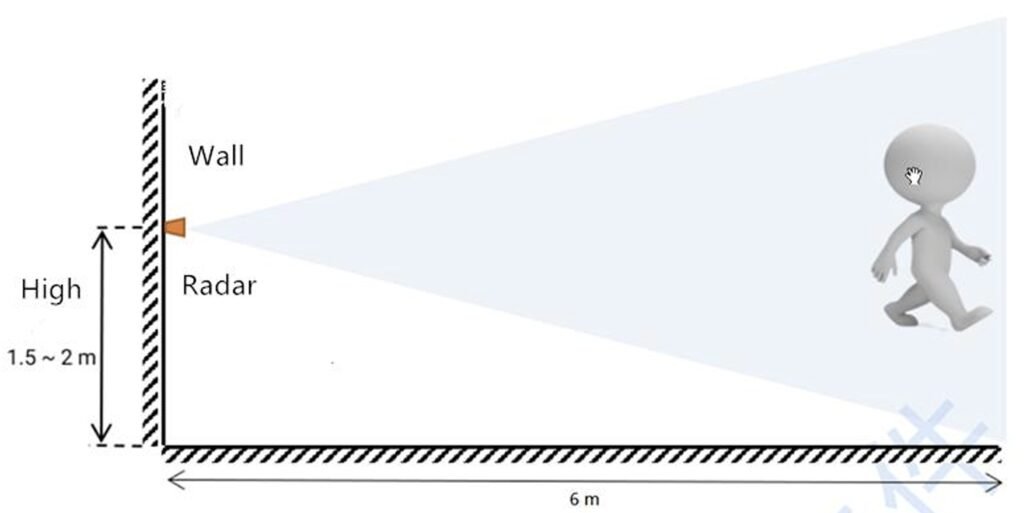
Source: HLK LD-2450
Mine is actually closer to knee height on a TV unit and still picks up the couch area reliably. If you’re starting from scratch though, I’d aim for:
- Roughly chest height
- A clear view of your seating areas
- Minimal obstructions in front of the radar
If your living area is open-plan (like my living room + kitchen combo), you may find you need a second sensor to cover the whole space properly.
What I’d Change in Version Two
This first version does exactly what I wanted, but there are a few things I’d tweak next time.
Enclosure Design
The current enclosure works, but:
- I’d like to shrink the footprint a bit
- I’d redesign the internal mounting so the boards sit cleaner
- I’d improve the lid so it locks more securely and doesn’t make the unit sit awkwardly
If it was wall-mounted that would matter less, but for a v2 I’d spend a bit more time on the mechanical design.
Temperature Sensor Placement
Putting a temperature sensor inside the same box as the ESP32 and radar isn’t great if you care about accurate room readings.
In a future version I would:
- Move the temperature sensor to a separate, more exposed enclosure, or
- Leave it out of this project and use a dedicated room sensor somewhere else
Smarter mmWave Sensor Automation
On the software side, there’s a lot more you can do with the LD2450 than just a binary presence signal. Things on my list:
- Using still vs moving targets differently (e.g. lower brightness if everyone is sitting quietly)
- Different behaviour for day vs night
- Using total target count to behave differently when there’s one person vs a group
That’s the nice thing about this kind of smart presence detection, you can start simple and layer on more logic over time.
Wrapping Up
Swapping a basic PIR sensor for an HLK-LD2450 mmWave sensor + ESP32-C3 + ESPHome has made a noticeable difference to how my living room behaves. No more mid-movie blackouts, no more manual switch-hunting when we forget to turn the tree off before bed.
From here, you can take the same DIY Home Assistant presence sensor and:
- Control lights, media, and climate instead of just a tree
- Add more sensors in other rooms
- Build more advanced automations around presence, time of day, and target counts
If you’ve got ideas for a version two – different automations, extra sensors, or other rooms where mmWave presence detection would be useful – I’d love to hear them.
Disclaimer: This project is shared for educational purposes only. If you choose to build it, you do so at your own risk. Double-check wiring, follow safety guidelines, and never work on live circuits if you’re unsure.
Nice video!
I bought a bunch of ESP32 C3s and am trying to get ESPresense working to track Bluetooth devices. I have put them in cases that are exactly the same size as the board, so ~20mm x 28mm… you might need to go a bit bigger to house the mmW sensor too… I thought about heat loss and when I 3D printed the case, I omitted the top/bottom layers so only the infill was printed… looks just like a grid 😊… maybe that would help with the temperature reading too! Am a bit worried about my soldering skills, but as you say, these parts are so cheap, you can afford to practice.
Looking on AliExpress there are really cheap vibration sensors… I was looking to combine an ESP32, vibration sensor and current clamp in a case with magnets for telling if washing machine/dryer have finished… but shortly after seeing this, I noted that my new washing machine already has a HA integration 😎😏 so I get messages when it completes the cycle!! (But for those without a smart washing machine🤔
Thank you! I hadn’t heard of ESPresence until now, thank you for mentioning it. It seems like a really interesting integration I could see myself using throughout the house. I would love to hear how you go with it all!
Very handy that your washing machine has a HA integration, I love how companies are starting to implement these features for people like us.
Thanks for this. I’m new to esphome and this is a great starter project. I’m now up and running with 2 detectors. They seem to have solved the timeout issue that I was having with IR.
I did find that I had to change up the yaml a little. According to ChatGPT, ESPHome has been reworking the LD2450 components, updating and changing the names of the sensors.
FWIW, my revised YAML is:
esphome:
name: presence-sensor-laundry
friendly_name: Laundry Room Presence Sensor
esp32:
board: esp32-c3-devkitm-1
framework:
type: esp-idf
wifi:
ssid: !secret wifi_ssid
password: !secret wifi_password
# Enable fallback hotspot (captive portal) in case wifi connection fails
ap:
ssid: “Presence-Sensor Fallback Hotspot”
password: “secret password”
captive_portal: null
logger:
api:
encryption:
key: “(Your key here)”
ota:
– platform: esphome
password: “Another secret password”
uart:
id: uart_ld2450
tx_pin: GPIO21 # update to your wiring (ESP32-C3 GPIOs vary by board)
rx_pin: GPIO20 # update to your wiring
baud_rate: 256000
ld2450:
uart_id: uart_ld2450
id: laundry_room_ld2450
binary_sensor:
– platform: ld2450
ld2450_id: laundry_room_ld2450
presence:
name: “Laundry Room Presence”
sensor:
– platform: ld2450
ld2450_id: laundry_room_ld2450
moving_target_count:
name: “Laundry Room Moving Targets”
still_target_count:
name: “Laundry Room Still Targets”
total_target_count:
name: “Laundry Room Total Targets”
i2c:
sda: GPIO8 # update to your wiring
scl: GPIO9
scan: true
This is working on Home Assistant OS 2026.2.1 and ESPHome 2026.1.4
Thanks for sharing this, and awesome to hear you’ve got two sensors running and the IR timeouts are gone.
Really appreciate you posting your updated YAML and the Home Assistant / ESPHome versions too, that’ll help a lot of people setting this up.
This is my working code (04/March/2026 with home assistant using your wiring. The temperature sensor is reasonably accurate outside an enclosure. The parts are really cheap on aliexpress. I strongly recommend buying the LD2450 with its 4Pin Cable along with some Dupont Male To Female cables.
Both sensors use the esp32’s common ground, I just spliced and soldered the cable. Things are tiny so you’re probably going to need a solder station with a magnifying glass.
ESP32 SuperMini
HLK-LD2450 MM Wave
BMP280 Temperature and Air Pressure Module.
Once you initiate your esp32 you can copy and paste all the code under captive_portal:
esphome:
name: r2
friendly_name: R2
esp32:
board: esp32-c3-devkitm-1
framework:
type: esp-idf
# Enable logging
logger:
# Enable Home Assistant API
api:
encryption:
key: “removed”
ota:
– platform: esphome
password: “removed”
wifi:
ssid: !secret wifi_ssid
password: !secret wifi_password
# Enable fallback hotspot (captive portal) in case wifi connection fails
ap:
ssid: “R2 Fallback Hotspot”
password: “removed”
captive_portal:
# UART configuration for LD2450 (required)
uart:
id: uart_bus
tx_pin: GPIO21 # Adjust if using different pins
rx_pin: GPIO20
baud_rate: 256000
parity: NONE
stop_bits: 1
# LD2450 component
ld2450:
uart_id: uart_bus
id: ld2450_radar
# Binary sensors for basic presence/motion
binary_sensor:
– platform: ld2450
ld2450_id: ld2450_radar
has_target:
name: “Presence Detected”
has_moving_target:
name: “Moving Target”
has_still_target:
name: “Still Target”
# Sensors for target counts and basic tracking (expand as needed)
sensor:
– platform: ld2450
ld2450_id: ld2450_radar
target_count:
name: “Total Targets”
moving_target_count:
name: “Moving Targets”
still_target_count:
name: “Still Targets”
target_1: # First target details
x:
name: “Target 1 X”
y:
name: “Target 1 Y”
distance:
name: “Target 1 Distance”
speed:
name: “Target 1 Speed”
– platform: bmp280_i2c
address: 0x76
temperature:
name: “My Room Temperature”
pressure:
name: “My Room Pressure”
update_interval: 30s
# Number entity for adjustable presence timeout (defaults to 5s; can be changed in HA)
number:
– platform: ld2450
ld2450_id: ld2450_radar
presence_timeout:
name: “Presence Timeout”
i2c:
sda: GPIO8 # update to your wiring
scl: GPIO9
scan: true
Thank you for your update. Is it still working as expected?
Yes, I did not get much time to play with it but I had it turning a light on and off based on Target 1 Distance. Total targets is good. I also think positioning is important. I don’t have it in an enclosure.