Indoor air quality is one of those things you usually do not think about until a room starts feeling off.
Maybe the air feels heavy. Maybe you have been sitting in a closed office for a few hours and cannot work out why you feel flat. Maybe you have just cooked dinner, used a cleaning spray, or lit a candle, and the room suddenly feels different.
The problem is that most of what affects indoor air is invisible. Fine particles, stale air, and fumes can all build up without much obvious warning. You notice the feeling before you know the cause.
That is what led me to build this DIY air quality sensor for Home Assistant.
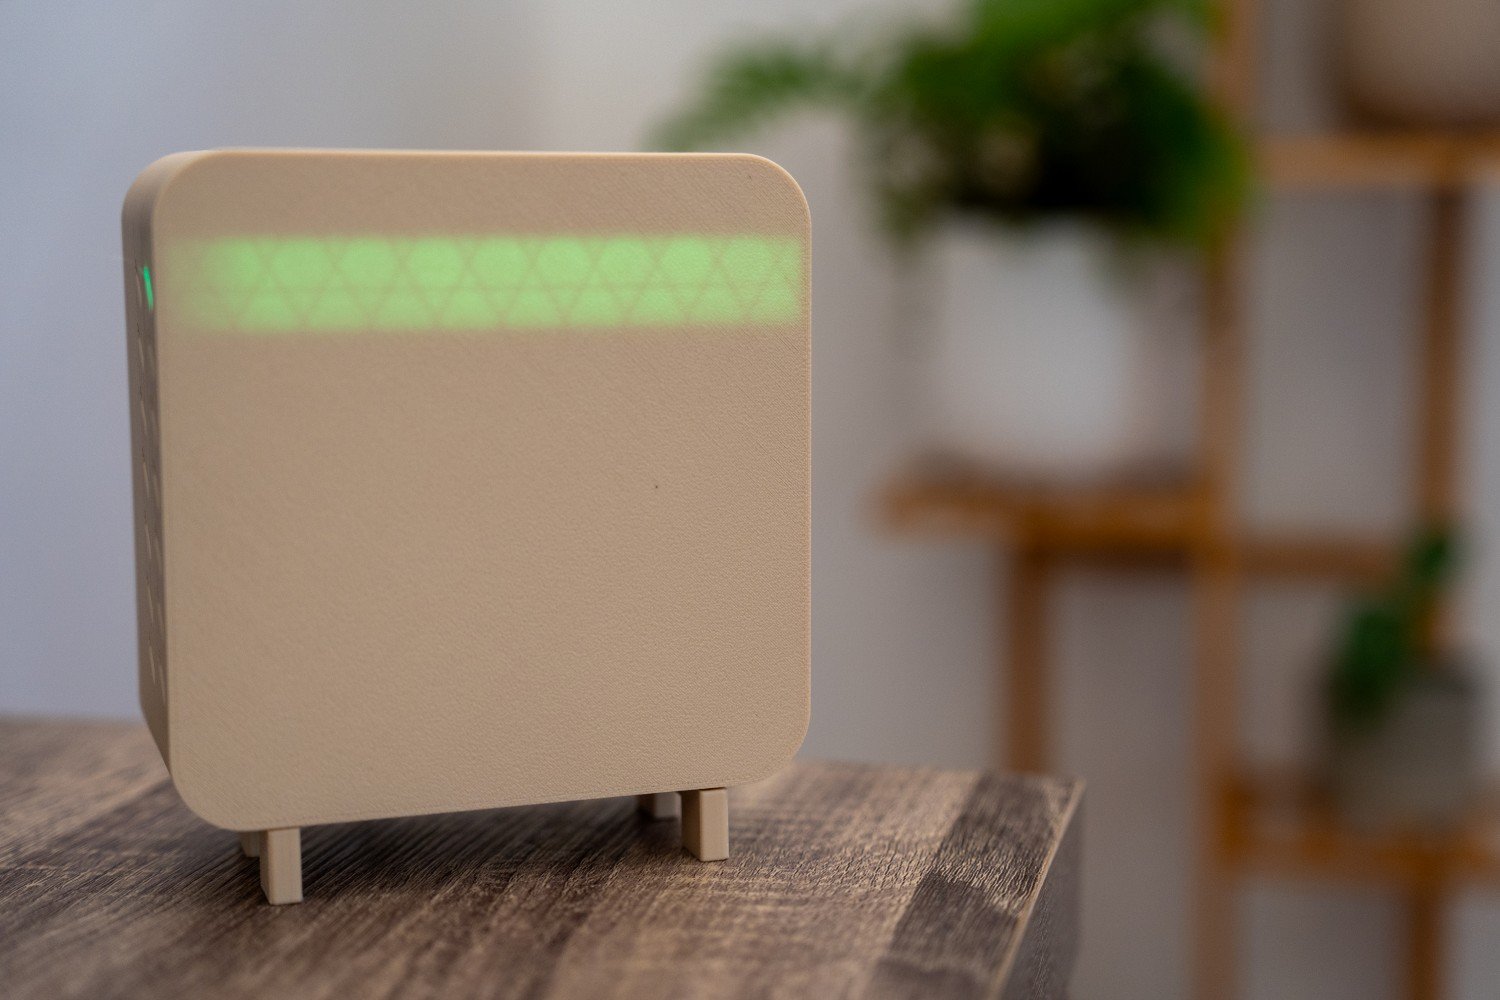
This project is an always-on indoor air monitor built around a Seeed Studio XIAO ESP32-C5, a few different sensors, and Home Assistant. It tracks particulate matter, CO2, gas changes, temperature, humidity, and pressure, then sends everything into Home Assistant over MQTT so I can graph it, monitor it, and use it for alerts.
This is not a lab-grade instrument, and that was never the goal. I wanted something practical that could sit in the house full time, quietly collect useful data, and help explain what the air in a room is actually doing.
What this build does
This air quality monitor measures:
- PM1.0, PM2.5, and PM10
- CO2
- gas changes from sprays, fumes, and general air quality events
- temperature
- humidity
- pressure
It is designed to be:
- mains powered
- always on
- connected to Home Assistant
- useful for long-term trends, not just one-off readings
If you want a small indoor sensor that gives you more than a single air quality number, this kind of setup works really well.
Parts used
These are the main parts I used in this build:
- Seeed Studio XIAO ESP32-C5 – main controller for Wi-Fi and sensor handling
- Seeeduino XIAO Expansion Board – makes the build easier to wire and test
- Grove Laser PM2.5 Sensor – measures PM1.0, PM2.5, and PM10
- Sensirion SCD41 – tracks indoor CO2 levels
- Grove Multichannel Gas Sensor v2 – reacts to fumes, sprays, and air quality changes
- BME280 – temperature, humidity, and pressure
- USB power source – keeps the monitor always on
- LED Strip – provide quick at-a-glance status feedback directly on the device
- 3D printed enclosure (or off the shelf box) – protects the hardware and helps with airflow and sensor placement
- Jumper wires and connectors – make it easier to wire the sensors and assemble the full build
Before you build
Before putting everything together, there are a few things worth checking.
First, this is best treated as an always-on indoor monitor, not a battery device. Some of these sensors benefit from stable power and time to settle, so mains power makes a lot more sense here.
Second, check the voltage requirements for each sensor. Do not assume everything is happy on the same rail just because it uses I2C. Some modules are fine on 3.3 V, while others are built around 5 V.
Third, make sure you know the I2C addresses of each device before final assembly. If two devices share the same address and neither can be changed, that becomes a problem very quickly.
And finally, keep the physical layout in mind from the start. Airflow, heat from the board, and sensor placement all affect how useful the readings are.
Why I chose these sensors
I wanted a build that could tell me more than just whether the air was “good” or “bad.” Different sensors pick up different kinds of events, and that extra context is what makes the data useful.
PM sensor
The particulate sensor measures PM1.0, PM2.5, and PM10.
This is useful for spotting things like dust, smoke, cooking particles, aerosols, and anything else that adds fine particles to the air. In day-to-day use, PM2.5 is usually one of the most useful readings because it gives a good picture of the smaller particles that build up during normal indoor life.

CO2 sensor
The SCD41 is one of the most useful sensors in the build because it tells you about ventilation.
This is not carbon monoxide. It is a way of seeing whether a room is getting stuffy because people are breathing in a space without enough fresh air coming in. Bedrooms, offices, and closed rooms are where this becomes most useful.

Gas sensor
The multichannel gas sensor is best treated as a trend sensor, not a precision instrument.
I do not use it to chase exact gas concentrations. I use it to spot changes. If the readings jump after using cleaner, deodorant, fly spray, candles, or while cooking, that tells me something in the room changed.
Temperature, humidity, and pressure
The BME280 adds extra context.
Temperature affects comfort. Humidity matters for how a room feels and can also be useful for things like condensation risk. Pressure is less important for everyday air quality decisions, but it is still handy to log alongside the rest of the data.
Why I built it this way
A lot of smart sensors are designed around battery life first. That makes sense for some devices, but not for this one.
I wanted this monitor to be powered all the time, with no sleep cycles, no flat batteries, and no gaps in the data. That suits the sensors better and makes the readings more consistent.
For Home Assistant, it is a much better fit too. The monitor can just sit there in the background, always feeding in fresh data instead of only checking the air every now and then.
Main controller and hardware choice
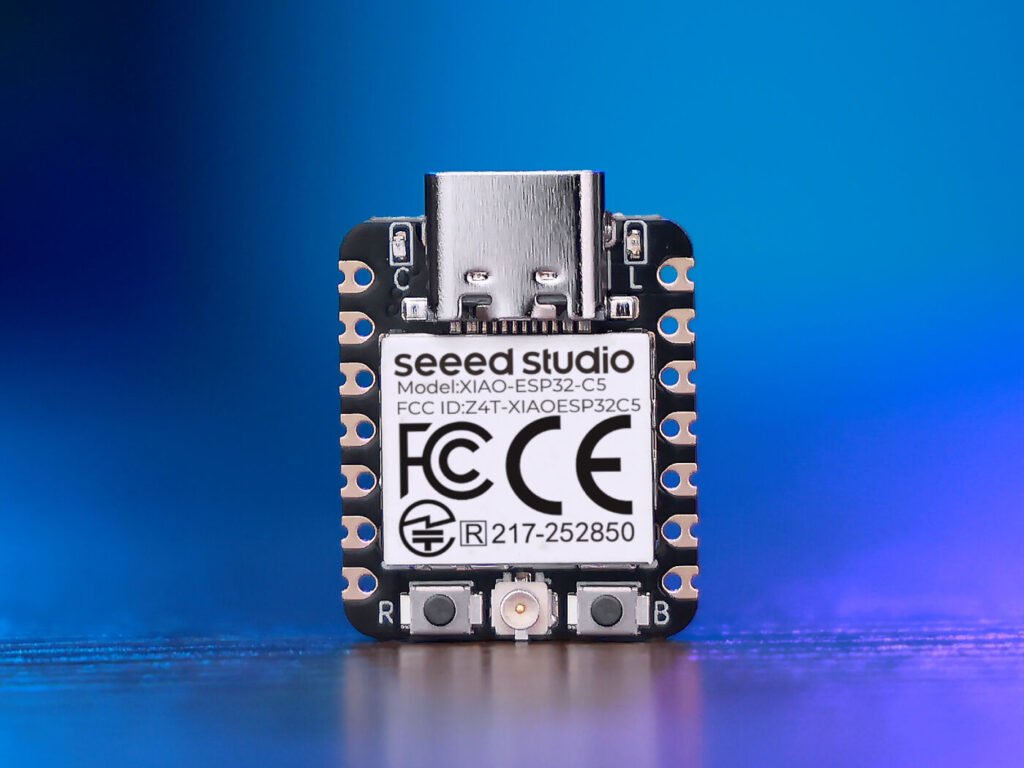
At the centre of the build is the Seeed Studio XIAO ESP32-C5.
It is a compact board, but it has more than enough power for a project like this. One of the things I like about it here is the connectivity. It supports both 2.4 GHz and 5 GHz Wi-Fi, which gives a bit more flexibility depending on the network and where the device ends up being placed.
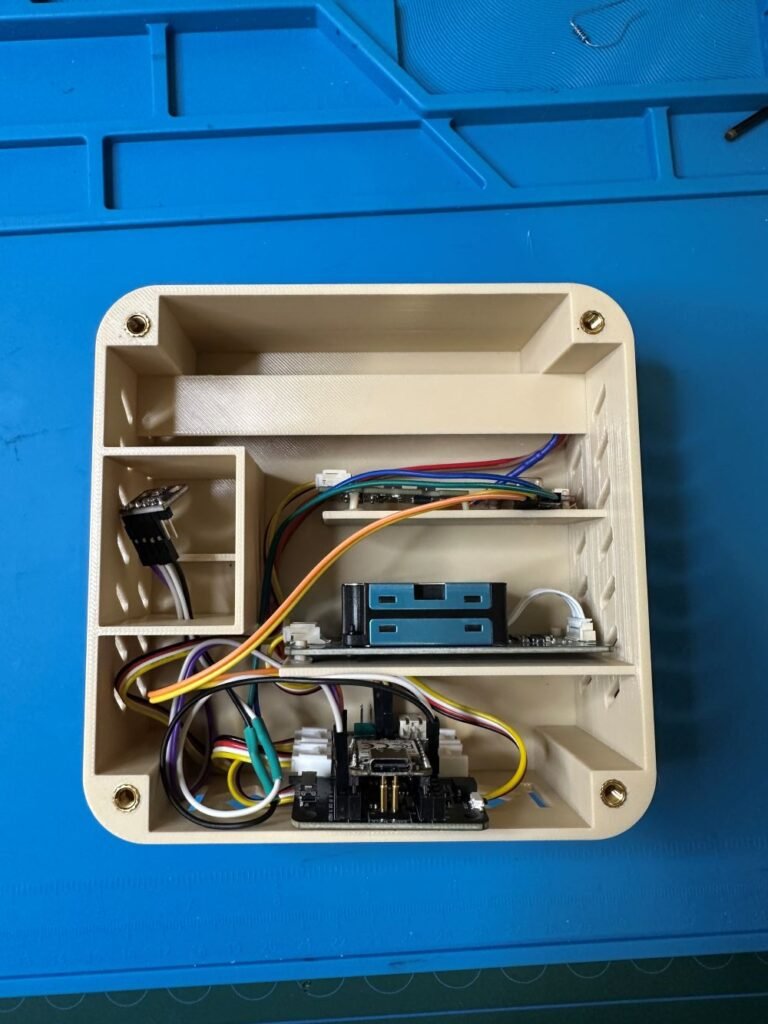
I mounted it on the Seeeduino XIAO Expansion Board because it makes the build easier to wire, easier to test, and generally neater to work with.
I also added LEDs so the device can give quick at-a-glance feedback without needing to open Home Assistant every time. They work well, although I would still improve the enclosure in the next revision so the infill pattern is less visible when the LEDs are lit.
Wiring the build
Most of the sensors in this project use I2C, which helps keep the wiring fairly simple. In most cases, that means power, ground, SDA, and SCL.
That said, this is one of those builds where clean wiring matters. Temporary sensor builds have a habit of becoming permanent, and messy wiring is one of the easiest ways to create problems later.
When wiring a setup like this, keep these things in mind:
- check the voltage requirement for each sensor
- confirm the I2C address of each device
- keep wiring runs neat and as short as practical
- avoid putting unnecessary strain on headers or jumper leads
- test one sensor at a time before closing the enclosure
Pin map

Enclosure and airflow
The enclosure matters more than a lot of people expect.
These sensors only measure the air that reaches them. That means placement and airflow have a real effect on how useful the readings are.
If you put the device in a dead corner, it may respond slowly. If you put it behind a monitor, it may mostly read warm monitor air. If you place it directly under an air conditioning vent, that can skew the readings the other way.
For this build, I wanted an enclosure that allowed natural airflow without forcing direct airflow across the sensors. I also wanted the internal layout to make sense. In the updated version, I refined the fit, adjusted the layout, and gave the BME280 its own small compartment to help separate it from the heat of the rest of the electronics.
That matters most for temperature readings. There is not much point measuring room temperature if the sensor is mostly reading the warmth of its own board.
I did consider adding a fan, but I left it out. A fan would add noise, pull in more dust, and make the build more complicated. For this project, passive airflow made more sense.
Software and Home Assistant integration
On the software side, the build is fairly simple.
The device connects to Wi-Fi, reads the sensors on a schedule, handles warm-up and filtering, publishes the values, and drives the LEDs for local status feedback.
In my setup, I read the sensors every 5 seconds and publish values every 30 seconds. That gives reasonably quick response without flooding Home Assistant with unnecessary updates.
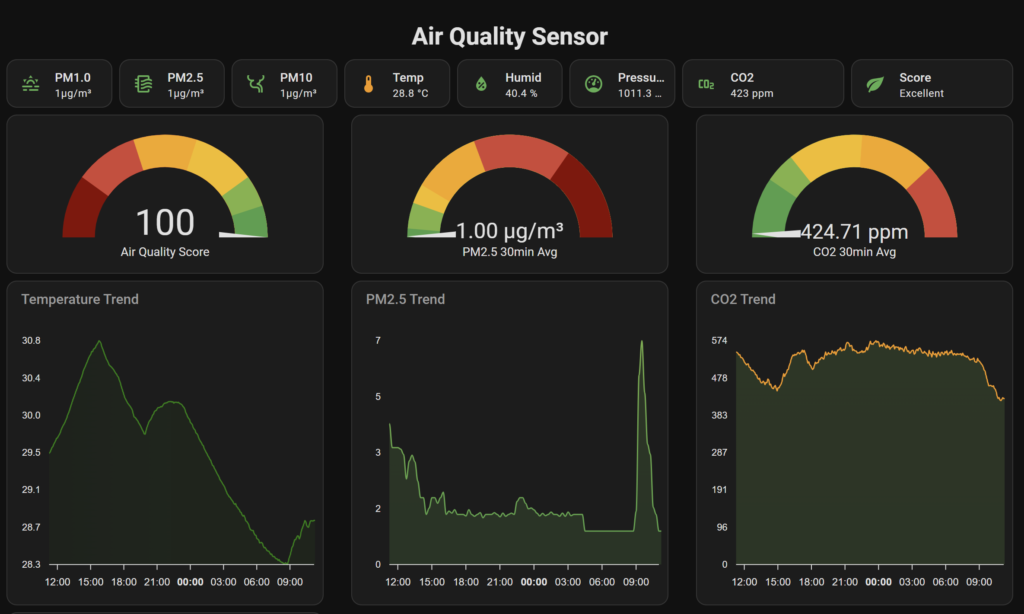
Once the data is in Home Assistant, the project becomes much more useful. This is where I can graph everything over time, compare readings, and create alerts that actually make sense.
The long-term trends are where the value really shows up. A single reading does not always tell you much, but patterns do.
Code
#include <WiFi.h>
#include <PubSubClient.h>
#include <ArduinoJson.h>
#include <Wire.h>
#include <ArduinoOTA.h>
#include <Adafruit_NeoPixel.h>

// ---- Sensors ----
// These libraries are used for the Grove / I2C air quality sensor modules.
#include "Seeed_HM330X.h"
#include "Multichannel_Gas_GMXXX.h"
#include <Adafruit_BME280.h>
#include <SensirionI2cScd4x.h>

// =====================
// USER CONFIG
// =====================
// Replace these values with your own Wi-Fi and MQTT broker details before uploading.
const char* WIFI_SSID     = "YOUR_WIFI_NAME";
const char* WIFI_PASSWORD = "YOUR_WIFI_PASSWORD";

const char* MQTT_HOST     = "192.168.0.11";   // Replace with your Home Assistant / MQTT broker IP
const uint16_t MQTT_PORT  = 1883;
const char* MQTT_USER     = "YOUR_MQTT_USERNAME";
const char* MQTT_PASS     = "YOUR_MQTT_PASSWORD";

const char* DEVICE_ID     = "aq_sensor_1";
const char* DEVICE_NAME   = "AQ Sensor";

// OTA allows you to upload new firmware over Wi-Fi after the first USB upload.
const char* OTA_HOSTNAME  = "aq-sensor-1";
const char* OTA_PASSWORD  = "CHANGE_THIS_OTA_PASSWORD";

// Timing settings.
// These control warm-up time, sensor sample rate, MQTT publish rate, and retry intervals.
const uint32_t BOOT_WAIT_MS      = 30 * 1000;
const uint32_t GAS_IGNORE_MS     = 3 * 60 * 1000;
const uint32_t SENSOR_SAMPLE_MS  = 5 * 1000;
const uint32_t PUBLISH_MS        = 30 * 1000;
const uint32_t WIFI_RETRY_MS     = 10 * 1000;
const uint32_t MQTT_RETRY_MS     = 5 * 1000;

// LED strip settings.
// Change LED_PIN and LED_COUNT to match your board and LED strip.
const int LED_PIN = 10;
const int LED_COUNT = 7;

// Rolling average settings.
// These smooth out sensor readings so the air score does not jump around too much.
const int AVG_WINDOW = 12;           // About 1 minute at 5 second sampling
const int VOC_BASELINE_WINDOW = 24;  // About 2 minutes at 5 second sampling

// =====================
// GLOBAL OBJECTS
// =====================
// These create the Wi-Fi, MQTT, sensor, and LED objects used throughout the sketch.
WiFiClient wifiClient;
PubSubClient mqtt(wifiClient);

HM330X hm330x;
GAS_GMXXX<TwoWire> gas;
Adafruit_BME280 bme;
SensirionI2cScd4x scd4x;
Adafruit_NeoPixel strip(LED_COUNT, LED_PIN, NEO_GRB + NEO_KHZ800);

u8 hmBuf[30];

// =====================
// GLOBAL STATE
// =====================
// These variables track timing, connection state, sensor availability, and last known readings.
uint32_t bootMillis = 0;
uint32_t warmupStartMillis = 0;
uint32_t lastPublish = 0;
uint32_t lastSample = 0;
uint32_t lastMqttAttempt = 0;
uint32_t lastWifiAttempt = 0;
uint32_t lastLedUpdate = 0;

uint16_t wifiAnimStep = 0;
uint16_t bootPulseStep = 0;
uint16_t envPulseStep = 0;
uint16_t warmupPulseStep = 0;
uint16_t otaAnimStep = 0;

bool hasHM3301 = false;
bool hasBME    = false;
bool hasGas    = false;
bool hasSCD41  = false;

bool wifiWasConnected = false;
bool otaReady = false;
bool otaInProgress = false;
bool sensorsWarmedUp = false;
bool scoreDisplayEnabled = false;
bool firstSampleTaken = false;

// Non-blocking green flash state.
// This gives a short LED flash when the device connects to Wi-Fi.
bool connectedFlashActive = false;
uint8_t connectedFlashTransitionsRemaining = 0;
bool connectedFlashLedOn = false;
uint32_t connectedFlashLastChange = 0;

// Last known sensor values.
// Home Assistant receives the last valid value rather than losing a sensor entity after one bad read.
uint16_t latestPm1 = 0;
uint16_t latestPm25 = 0;
uint16_t latestPm10 = 0;

float latestTemperature = NAN;
float latestHumidity = NAN;
float latestPressure = NAN;

int latestNo2 = 0;
int latestC2H5CH = 0;
int latestVoc = 0;
int latestCo = 0;

uint16_t latestCo2 = 400;
int latestAirScore = 100;

// Current-cycle valid flags.
bool validPm = false;
bool validBme = false;
bool validGas = false;
bool validCo2 = false;

// These flags track whether each sensor has ever returned a valid reading.
bool everValidPm = false;
bool everValidBme = false;
bool everValidGas = false;
bool everValidCo2 = false;

// Rolling average buffers.
float pm25History[AVG_WINDOW] = {0};
float co2History[AVG_WINDOW]  = {400};
float vocHistory[AVG_WINDOW]  = {0};

// Separate VOC baseline history.
// The VOC baseline helps detect spikes instead of treating every normal room change as bad air.
float vocBaselineHistory[VOC_BASELINE_WINDOW] = {0};

int pm25Count = 0;
int co2Count  = 0;
int vocCount  = 0;
int pm25Index = 0;
int co2Index  = 0;
int vocIndex  = 0;

int vocBaselineCount = 0;
int vocBaselineIndex = 0;

// Fixed MQTT topics.
// These are built from DEVICE_ID during setup.
char topic_state[80];
char topic_avty[80];

enum AirQualityLevel {
  AQ_GREEN = 0,
  AQ_YELLOW,
  AQ_ORANGE,
  AQ_RED,
  AQ_PURPLE
};

// =====================
// GENERAL HELPERS
// =====================
static void buildTopics() {
  snprintf(topic_state, sizeof(topic_state), "aq_sensor/%s/state", DEVICE_ID);
  snprintf(topic_avty,  sizeof(topic_avty),  "aq_sensor/%s/availability", DEVICE_ID);
}

static bool i2cDevicePresent(uint8_t address) {
  Wire.beginTransmission(address);
  return (Wire.endTransmission() == 0);
}

static void scanI2C() {
  Serial.println("Scanning I2C bus...");
  uint8_t count = 0;

  for (uint8_t address = 1; address < 127; address++) {
    Wire.beginTransmission(address);
    if (Wire.endTransmission() == 0) {
      Serial.print("I2C device found at 0x");
      if (address < 16) Serial.print("0");
      Serial.println(address, HEX);
      count++;
    }
  }

  if (count == 0) Serial.println("No I2C devices found");
  else Serial.println("I2C scan complete");
}

// =====================
// LED HELPERS
// =====================
// The LED strip is used to show boot, Wi-Fi, warm-up, OTA, and air quality states.
static void setupLeds() {
  strip.begin();
  strip.clear();
  strip.setBrightness(255);
  strip.show();
}

static uint8_t triangleWave(uint16_t step, uint16_t period, uint8_t minVal, uint8_t maxVal) {
  if (period < 4) return maxVal;

  uint16_t phase = step % period;
  uint16_t half = period / 2;

  if (phase < half) {
    return map(phase, 0, half - 1, minVal, maxVal);
  } else {
    return map(phase, half, period - 1, maxVal, minVal);
  }
}

static uint8_t biasedPulseWave(uint16_t step, uint16_t period, uint8_t minVal, uint8_t maxVal) {
  if (period < 4) return maxVal;

  float phase = (float)(step % period) / (float)(period - 1);

  // Sine wave gives a smoother pulse.
  // powf keeps the LED dim for longer and bright for less time.
  float s = (sinf(phase * 2.0f * PI - PI / 2.0f) + 1.0f) * 0.5f;
  s = powf(s, 2.2f);

  return (uint8_t)(minVal + (maxVal - minVal) * s);
}

static void fillAll(uint32_t color) {
  for (int i = 0; i < LED_COUNT; i++) {
    strip.setPixelColor(i, color);
  }
  strip.show();
}

static void ledsOff() {
  strip.clear();
  strip.show();
}

static void updateBootLeds() {
  const uint32_t now = millis();
  if (now - lastLedUpdate < 25) return;
  lastLedUpdate = now;

  uint8_t red = triangleWave(bootPulseStep, 120, 10, 255);
  fillAll(strip.Color(red, 0, 0));
  bootPulseStep++;
}

static void updateWifiConnectingLeds() {
  const uint32_t now = millis();
  if (now - lastLedUpdate < 45) return;
  lastLedUpdate = now;

  int head  = wifiAnimStep % LED_COUNT;
  int tail1 = (head - 1 + LED_COUNT) % LED_COUNT;
  int tail2 = (head - 2 + LED_COUNT) % LED_COUNT;

  strip.clear();
  strip.setPixelColor(head,  strip.Color(0, 80, 255));
  strip.setPixelColor(tail1, strip.Color(0, 30, 170));
  strip.setPixelColor(tail2, strip.Color(0, 8, 70));
  strip.show();

  wifiAnimStep++;
}

static void startConnectedFlash() {
  connectedFlashActive = true;
  connectedFlashTransitionsRemaining = 4;
  connectedFlashLedOn = false;
  connectedFlashLastChange = 0;
}

static void updateConnectedFlash() {
  if (!connectedFlashActive) return;

  const uint32_t now = millis();
  const uint32_t interval = connectedFlashLedOn ? 120 : 100;

  if (connectedFlashLastChange != 0 && now - connectedFlashLastChange < interval) {
    return;
  }

  connectedFlashLastChange = now;
  connectedFlashLedOn = !connectedFlashLedOn;

  if (connectedFlashLedOn) {
    fillAll(strip.Color(40, 255, 90));
  } else {
    ledsOff();
  }

  if (connectedFlashTransitionsRemaining > 0) {
    connectedFlashTransitionsRemaining--;
  }

  if (connectedFlashTransitionsRemaining == 0) {
    connectedFlashActive = false;
    connectedFlashLedOn = false;
    ledsOff();
  }
}

static void updateWarmupLeds() {
  const uint32_t now = millis();
  if (now - lastLedUpdate < 45) return;
  lastLedUpdate = now;

  uint8_t brightness = biasedPulseWave(warmupPulseStep, 280, 4, 40);

  fillAll(strip.Color(
    (uint8_t)(brightness * 0.55f),
    (uint8_t)(brightness * 0.82f),
    (uint8_t)(brightness * 1.00f)
  ));

  warmupPulseStep++;
}

static void updateOTALeds() {
  const uint32_t now = millis();
  if (now - lastLedUpdate < 35) return;
  lastLedUpdate = now;

  int head  = otaAnimStep % LED_COUNT;
  int tail1 = (head - 1 + LED_COUNT) % LED_COUNT;
  int tail2 = (head - 2 + LED_COUNT) % LED_COUNT;
  int tail3 = (head - 3 + LED_COUNT) % LED_COUNT;

  strip.clear();
  strip.setPixelColor(head,  strip.Color(0, 170, 255));
  strip.setPixelColor(tail1, strip.Color(0, 90, 220));
  strip.setPixelColor(tail2, strip.Color(0, 35, 120));
  strip.setPixelColor(tail3, strip.Color(0, 10, 45));
  strip.show();

  otaAnimStep++;
}

// =====================
// ROLLING AVERAGE HELPERS
// =====================
// Rolling averages smooth readings from noisy sensors before they are used in the air score.
static void pushHistory(float* buffer, int windowSize, int& index, int& count, float value) {
  buffer[index] = value;
  index = (index + 1) % windowSize;
  if (count < windowSize) count++;
}

static float averageHistory(const float* buffer, int count, float fallback) {
  if (count <= 0) return fallback;

  float sum = 0.0f;
  for (int i = 0; i < count; i++) {
    sum += buffer[i];
  }
  return sum / (float)count;
}

// =====================
// AIR SCORE LOGIC
// =====================
// The air score is a simple 0-100 score based mainly on PM2.5 and CO2.
// VOC is treated as a small spike penalty after the gas sensor warm-up period.
static float computePmPenalty(float pm) {
  if (pm <= 5.0f) return 0.0f;
  if (pm <= 35.0f) return (pm - 5.0f) * 1.6f;
  if (pm <= 55.5f) return 48.0f + (pm - 35.0f) * 1.0f;
  if (pm <= 125.5f) return 68.5f + (pm - 55.5f) * 0.30f;
  return 89.5f + (pm - 125.5f) * 0.05f;
}

static float computeCo2Penalty(float co2) {
  if (co2 <= 600.0f) return 0.0f;
  if (co2 <= 1200.0f) return (co2 - 600.0f) / 12.0f;
  if (co2 <= 2000.0f) return 50.0f + (co2 - 1200.0f) / 20.0f;
  return 90.0f + (co2 - 2000.0f) / 50.0f;
}

static bool gasContributionActive() {
  return (millis() - bootMillis) >= GAS_IGNORE_MS;
}

static float computeVocPenaltySpikeOnly(float vocShortAvg, float vocBaseline) {
  const float VOC_MIN_TRIGGER  = 700.0f;
  const float VOC_SPIKE_MARGIN = 120.0f;
  const float VOC_MAX_PENALTY  = 8.0f;

  if (!gasContributionActive()) return 0.0f;
  if (vocShortAvg < VOC_MIN_TRIGGER) return 0.0f;

  float spike = vocShortAvg - vocBaseline;
  if (spike < VOC_SPIKE_MARGIN) return 0.0f;

  float effectiveSpike = spike - VOC_SPIKE_MARGIN;
  float penalty = effectiveSpike * 0.03f;

  if (penalty > VOC_MAX_PENALTY) penalty = VOC_MAX_PENALTY;
  return penalty;
}

static int computeAirScore(float pmAvg, float co2Avg, float vocShortAvg, float vocBaseline) {
  float pmPenalty  = computePmPenalty(pmAvg);
  float co2Penalty = computeCo2Penalty(co2Avg);
  float vocPenalty = computeVocPenaltySpikeOnly(vocShortAvg, vocBaseline);

  float score = 100.0f - pmPenalty - co2Penalty - vocPenalty;

  if (score < 0.0f) score = 0.0f;
  if (score > 100.0f) score = 100.0f;

  return (int)roundf(score);
}

static AirQualityLevel scoreToLevel(int score) {
  if (score >= 85) return AQ_GREEN;
  if (score >= 70) return AQ_YELLOW;
  if (score >= 55) return AQ_ORANGE;
  if (score >= 35) return AQ_PURPLE;
  return AQ_RED;
}

static uint32_t levelColor(AirQualityLevel level, uint8_t scale = 255) {
  switch (level) {
    case AQ_GREEN:
      return strip.Color(0, (uint8_t)(scale * 0.72f), 0);

    case AQ_YELLOW:
      return strip.Color((uint8_t)(scale * 0.38f), (uint8_t)(scale * 0.82f), 0);

    case AQ_ORANGE:
      return strip.Color((uint8_t)(scale * 0.78f), (uint8_t)(scale * 0.42f), 0);

    case AQ_PURPLE:
      return strip.Color((uint8_t)(scale * 0.42f), 0, (uint8_t)(scale * 0.70f));

    case AQ_RED:
      return strip.Color((uint8_t)(scale * 0.75f), 0, 0);

    default:
      return strip.Color(0, (uint8_t)(scale * 0.72f), 0);
  }
}

static void updateEnvironmentLedsFromScore(int score) {
  const uint32_t now = millis();
  if (now - lastLedUpdate < 45) return;
  lastLedUpdate = now;

  AirQualityLevel level = scoreToLevel(score);
  uint8_t brightness = biasedPulseWave(envPulseStep, 260, 10, 72);

  fillAll(levelColor(level, brightness));
  envPulseStep++;
}

// =====================
// WIFI AND OTA
// =====================
// Wi-Fi is handled without blocking the main loop, so sensors and LEDs keep working.
static void startWifiConnection() {
  Serial.print("Starting WiFi connection to ");
  Serial.println(WIFI_SSID);
  WiFi.mode(WIFI_STA);
  WiFi.begin(WIFI_SSID, WIFI_PASSWORD);
  lastWifiAttempt = millis();
}

static void setupOTA() {
  if (otaReady) return;

  ArduinoOTA.setHostname(OTA_HOSTNAME);
  ArduinoOTA.setPassword(OTA_PASSWORD);
  ArduinoOTA.setMdnsEnabled(true);

  ArduinoOTA
    .onStart([]() {
      otaInProgress = true;
      Serial.println("OTA update starting...");
    })
    .onEnd([]() {
      otaInProgress = false;
      Serial.println("\nOTA update complete");
    })
    .onProgress([](unsigned int progress, unsigned int total) {
      Serial.printf("OTA progress: %u%%\r", (progress * 100U) / total);
    })
    .onError([](ota_error_t error) {
      otaInProgress = false;
      Serial.printf("OTA error [%u]: ", error);
      if (error == OTA_AUTH_ERROR) Serial.println("Auth failed");
      else if (error == OTA_BEGIN_ERROR) Serial.println("Begin failed");
      else if (error == OTA_CONNECT_ERROR) Serial.println("Connect failed");
      else if (error == OTA_RECEIVE_ERROR) Serial.println("Receive failed");
      else if (error == OTA_END_ERROR) Serial.println("End failed");
      else Serial.println("Unknown error");
    });

  ArduinoOTA.begin();
  otaReady = true;

  Serial.print("OTA ready. Hostname: ");
  Serial.println(OTA_HOSTNAME);
  Serial.print("OTA IP: ");
  Serial.println(WiFi.localIP());
}

static void handleWiFi() {
  bool wifiConnected = (WiFi.status() == WL_CONNECTED);

  if (wifiConnected) {
    if (!wifiWasConnected) {
      Serial.print("WiFi connected, IP: ");
      Serial.println(WiFi.localIP());
      startConnectedFlash();
      setupOTA();
      wifiWasConnected = true;
    }
    return;
  }

  if (wifiWasConnected) {
    Serial.println("WiFi lost");
    wifiWasConnected = false;
  }

  updateWifiConnectingLeds();

  uint32_t now = millis();
  if (lastWifiAttempt == 0 || (now - lastWifiAttempt >= WIFI_RETRY_MS)) {
    Serial.println("Retrying WiFi...");
    WiFi.disconnect();
    WiFi.begin(WIFI_SSID, WIFI_PASSWORD);
    lastWifiAttempt = now;
  }
}

// =====================
// HOME ASSISTANT MQTT DISCOVERY
// =====================
// Home Assistant MQTT Discovery creates the sensor entities automatically.
// The discovery messages are retained so Home Assistant remembers the entities after reboot.
static void publishDiscoveryOne(const char* objectId,
                                const char* niceName,
                                const char* deviceClass,
                                const char* stateClass,
                                const char* unit,
                                const char* valueTemplate,
                                const char* icon) {
  char discoveryTopic[140];
  snprintf(discoveryTopic, sizeof(discoveryTopic),
           "homeassistant/sensor/%s/%s/config", DEVICE_ID, objectId);

  StaticJsonDocument<768> doc;

  char fullName[96];
  snprintf(fullName, sizeof(fullName), "%s %s", DEVICE_NAME, niceName);

  char uniq[96];
  snprintf(uniq, sizeof(uniq), "%s_%s", DEVICE_ID, objectId);

  doc["name"] = fullName;
  doc["unique_id"] = uniq;
  doc["state_topic"] = topic_state;
  doc["availability_topic"] = topic_avty;

  if (valueTemplate && valueTemplate[0]) doc["value_template"] = valueTemplate;
  if (unit && unit[0]) doc["unit_of_measurement"] = unit;
  if (deviceClass && deviceClass[0]) doc["device_class"] = deviceClass;
  if (stateClass && stateClass[0]) doc["state_class"] = stateClass;
  if (icon && icon[0]) doc["icon"] = icon;

  JsonObject dev = doc["device"].to<JsonObject>();
  dev["identifiers"] = DEVICE_ID;
  dev["name"] = DEVICE_NAME;
  dev["manufacturer"] = "DIY";
  dev["model"] = "ESP32 Air Quality Sensor";
  dev["sw_version"] = "mqtt-arduino-ota-led-aq-score";

  char out[768];
  size_t n = serializeJson(doc, out, sizeof(out));

  bool ok = mqtt.publish(discoveryTopic, (const uint8_t*)out, (unsigned int)n, true);
  Serial.print("Discovery ");
  Serial.print(objectId);
  Serial.print(" -> ");
  Serial.println(ok ? "OK" : "FAIL");
}

static void publishAllDiscovery() {
  publishDiscoveryOne("temperature", "Temperature", "temperature", "measurement", "°C",
                      "{{ value_json.temperature }}", nullptr);
  publishDiscoveryOne("humidity", "Humidity", "humidity", "measurement", "%",
                      "{{ value_json.humidity }}", nullptr);
  publishDiscoveryOne("pressure", "Pressure", "pressure", "measurement", "hPa",
                      "{{ value_json.pressure_hpa }}", nullptr);

  publishDiscoveryOne("pm1_0", "PM1.0", nullptr, "measurement", "µg/m³",
                      "{{ value_json.pm1_0 }}", "mdi:blur");
  publishDiscoveryOne("pm2_5", "PM2.5", nullptr, "measurement", "µg/m³",
                      "{{ value_json.pm2_5 }}", "mdi:blur");
  publishDiscoveryOne("pm10", "PM10", nullptr, "measurement", "µg/m³",
                      "{{ value_json.pm10 }}", "mdi:blur");

  publishDiscoveryOne("gas_no2", "NO₂ Index", nullptr, "measurement", "index",
                      "{{ value_json.no2_idx }}", "mdi:molecule");
  publishDiscoveryOne("gas_c2h5ch", "C2H5CH Index", nullptr, "measurement", "index",
                      "{{ value_json.c2h5ch_idx }}", "mdi:cloud");
  publishDiscoveryOne("gas_voc", "VOC Index", nullptr, "measurement", "index",
                      "{{ value_json.voc_idx }}", "mdi:chemical-weapon");
  publishDiscoveryOne("gas_co", "CO Index", nullptr, "measurement", "index",
                      "{{ value_json.co_idx }}", "mdi:molecule-co");

  publishDiscoveryOne("co2", "CO2", "carbon_dioxide", "measurement", "ppm",
                      "{{ value_json.co2 }}", "mdi:molecule-co2");

  publishDiscoveryOne("wifi_rssi", "WiFi RSSI", "signal_strength", "measurement", "dBm",
                      "{{ value_json.wifi_rssi }}", "mdi:wifi");

  publishDiscoveryOne("air_score", "Air Score", nullptr, "measurement", "",
                      "{{ value_json.air_score }}", "mdi:chart-line");

  publishDiscoveryOne("ip", "IP Address", nullptr, nullptr, "",
                      "{{ value_json.ip }}", "mdi:ip-network");
}

// =====================
// SENSOR READ FUNCTIONS
// =====================
// Each function returns true only when a valid reading was received.
static bool readHM3301(uint16_t &pm1, uint16_t &pm25, uint16_t &pm10) {
  if (!hasHM3301) return false;
  if (hm330x.read_sensor_value(hmBuf, 29) != 0) return false;

  pm1  = ((uint16_t)hmBuf[10] << 8) | hmBuf[11];
  pm25 = ((uint16_t)hmBuf[12] << 8) | hmBuf[13];
  pm10 = ((uint16_t)hmBuf[14] << 8) | hmBuf[15];
  return true;
}

static bool readBME280(float &tC, float &rh, float &hPa) {
  if (!hasBME) return false;

  tC  = bme.readTemperature();
  rh  = bme.readHumidity();
  hPa = bme.readPressure() / 100.0f;
  return !(isnan(tC) || isnan(rh) || isnan(hPa));
}

static bool readGas4(int &no2, int &c2h5ch, int &voc, int &co) {
  if (!hasGas) return false;

  no2    = gas.getGM102B();
  c2h5ch = gas.getGM302B();
  voc    = gas.getGM502B();
  co     = gas.getGM702B();

  if (no2 < 0 && c2h5ch < 0 && voc < 0 && co < 0) return false;

  if (no2 < 0) no2 = 0;
  if (c2h5ch < 0) c2h5ch = 0;
  if (voc < 0) voc = 0;
  if (co < 0) co = 0;

  return true;
}

static bool readSCD41(uint16_t &co2ppm) {
  if (!hasSCD41) return false;

  bool dataReady = false;
  uint16_t co2 = 0;
  float temperature = 0.0f;
  float humidity = 0.0f;

  int16_t error = scd4x.getDataReadyStatus(dataReady);
  if (error != 0) {
    Serial.print("SCD41 getDataReadyStatus failed: ");
    Serial.println(error);
    return false;
  }

  if (!dataReady) return false;

  error = scd4x.readMeasurement(co2, temperature, humidity);
  if (error != 0) {
    Serial.print("SCD41 readMeasurement failed: ");
    Serial.println(error);
    return false;
  }

  if (co2 == 0) return false;

  co2ppm = co2;
  return true;
}

// =====================
// SAMPLE SENSORS AND UPDATE STATE
// =====================
// This reads each sensor, stores the latest good values, updates rolling averages,
// and calculates the current air score.
static void sampleSensorsAndUpdateState() {
  uint16_t pm1 = 0, pm25 = 0, pm10 = 0;
  float tC = NAN, rh = NAN, hPa = NAN;
  int no2 = 0, c2h5ch = 0, voc = 0, co = 0;
  uint16_t co2ppm = 0;

  bool okPm  = readHM3301(pm1, pm25, pm10);
  bool okBme = readBME280(tC, rh, hPa);
  bool okGas = readGas4(no2, c2h5ch, voc, co);
  bool okCO2 = readSCD41(co2ppm);

  validPm = okPm;
  validBme = okBme;
  validGas = okGas;
  validCo2 = okCO2;

  if (okPm) {
    latestPm1 = pm1;
    latestPm25 = pm25;
    latestPm10 = pm10;
    everValidPm = true;
    pushHistory(pm25History, AVG_WINDOW, pm25Index, pm25Count, (float)latestPm25);
  } else {
    Serial.println("HM3301 read failed");
  }

  if (okBme) {
    latestTemperature = tC;
    latestHumidity = rh;
    latestPressure = hPa;
    everValidBme = true;
  }

  if (okGas) {
    latestNo2 = no2;
    latestC2H5CH = c2h5ch;
    latestVoc = voc;
    latestCo = co;
    everValidGas = true;

    pushHistory(vocHistory, AVG_WINDOW, vocIndex, vocCount, (float)latestVoc);
    pushHistory(vocBaselineHistory, VOC_BASELINE_WINDOW, vocBaselineIndex, vocBaselineCount, (float)latestVoc);
  } else if (hasGas) {
    Serial.println("Gas sensor read failed or returned invalid values");
  }

  if (okCO2) {
    latestCo2 = co2ppm;
    everValidCo2 = true;
    pushHistory(co2History, AVG_WINDOW, co2Index, co2Count, (float)latestCo2);
  }

  float pmAvg       = averageHistory(pm25History, pm25Count, (float)latestPm25);
  float co2Avg      = averageHistory(co2History, co2Count, (float)latestCo2);
  float vocShortAvg = averageHistory(vocHistory, vocCount, (float)latestVoc);
  float vocBaseline = averageHistory(vocBaselineHistory, vocBaselineCount, (float)latestVoc);

  latestAirScore = computeAirScore(pmAvg, co2Avg, vocShortAvg, vocBaseline);

  Serial.print("Averages used for score -> PM2.5: ");
  Serial.print(pmAvg, 1);
  Serial.print(" | CO2: ");
  Serial.print(co2Avg, 0);
  Serial.print(" | VOC now: ");
  Serial.print(latestVoc);
  Serial.print(" | VOC short avg: ");
  Serial.print(vocShortAvg, 1);
  Serial.print(" | VOC baseline: ");
  Serial.print(vocBaseline, 1);
  Serial.print(" | VOC active: ");
  Serial.println(gasContributionActive() ? "YES" : "NO");

  Serial.print("LED / Gauge air score: ");
  Serial.println(latestAirScore);

  firstSampleTaken = true;
  if (sensorsWarmedUp && firstSampleTaken) {
    scoreDisplayEnabled = true;
  }
}

// =====================
// MQTT STATE PUBLISH
// =====================
// This publishes one JSON payload containing all available sensor values.
static bool publishState() {
  StaticJsonDocument<768> doc;
  doc["wifi_rssi"] = WiFi.RSSI();
  doc["air_score"] = latestAirScore;
  doc["ip"] = WiFi.localIP().toString();

  if (everValidBme) {
    doc["temperature"] = latestTemperature;
    doc["humidity"] = latestHumidity;
    doc["pressure_hpa"] = latestPressure;
  }

  if (everValidPm) {
    doc["pm1_0"] = latestPm1;
    doc["pm2_5"] = latestPm25;
    doc["pm10"]  = latestPm10;
  }

  if (everValidGas) {
    doc["no2_idx"]    = latestNo2;
    doc["c2h5ch_idx"] = latestC2H5CH;
    doc["voc_idx"]    = latestVoc;
    doc["co_idx"]     = latestCo;
  }

  if (everValidCo2) {
    doc["co2"] = latestCo2;
  }

  char out[768];
  size_t n = serializeJson(doc, out, sizeof(out));

  Serial.print("Publishing state -> ");
  Serial.println(topic_state);
  Serial.println(out);

  bool ok = mqtt.publish(topic_state, (const uint8_t*)out, (unsigned int)n, true);
  Serial.println(ok ? "State publish OK" : "State publish FAIL");

  return ok;
}

// =====================
// MQTT CONNECTION
// =====================
// MQTT is used to send data to Home Assistant.
static bool mqttConnect() {
  if (WiFi.status() != WL_CONNECTED) return false;

  mqtt.setServer(MQTT_HOST, MQTT_PORT);
  mqtt.setKeepAlive(30);
  mqtt.setBufferSize(1024);
  mqtt.setSocketTimeout(10);

  char clientId[80];
  uint8_t mac[6];
  WiFi.macAddress(mac);
  snprintf(clientId, sizeof(clientId), "%s_%02X%02X%02X%02X%02X%02X",
           DEVICE_ID, mac[0], mac[1], mac[2], mac[3], mac[4], mac[5]);

  Serial.print("MQTT connecting as ");
  Serial.println(clientId);

  bool ok;
  if (MQTT_USER && MQTT_USER[0]) {
    ok = mqtt.connect(clientId, MQTT_USER, MQTT_PASS, topic_avty, 1, true, "offline");
  } else {
    ok = mqtt.connect(clientId, nullptr, nullptr, topic_avty, 1, true, "offline");
  }

  if (!ok) {
    Serial.print("MQTT connect failed, rc=");
    Serial.println(mqtt.state());
    return false;
  }

  bool avtyOk = mqtt.publish(topic_avty, "online", true);
  Serial.println(avtyOk ? "Availability publish OK" : "Availability publish FAIL");

  Serial.println("MQTT connected. Publishing discovery...");
  publishAllDiscovery();

  return true;
}

// =====================
// SENSOR SETUP
// =====================
// The sketch checks which I2C sensors are connected and only enables the ones it finds.
static void initSensors() {
  scanI2C();

  if (hm330x.init() != 0) {
    hasHM3301 = false;
    Serial.println("HM3301 init failed");
  } else {
    hasHM3301 = true;
    Serial.println("HM3301 OK");
  }

  if (i2cDevicePresent(0x08)) {
    gas.begin(Wire, 0x08);
    hasGas = true;
    Serial.println("Gas sensor detected at 0x08 and initialised");
  } else {
    hasGas = false;
    Serial.println("Gas sensor not detected at 0x08");
  }

  hasBME = bme.begin(0x76) || bme.begin(0x77);
  Serial.println(hasBME ? "BME280 OK" : "BME280 not found");

  if (i2cDevicePresent(0x62)) {
    scd4x.begin(Wire, 0x62);

    int16_t error = scd4x.stopPeriodicMeasurement();
    if (error != 0) {
      Serial.print("SCD41 stopPeriodicMeasurement returned: ");
      Serial.println(error);
    }
    delay(500);

    error = scd4x.startPeriodicMeasurement();
    if (error != 0) {
      hasSCD41 = false;
      Serial.print("SCD41 startPeriodicMeasurement failed: ");
      Serial.println(error);
    } else {
      hasSCD41 = true;
      Serial.println("SCD41 detected at 0x62 and started");
    }
  } else {
    hasSCD41 = false;
    Serial.println("SCD41 not detected at 0x62");
  }
}

// =====================
// SETUP
// =====================
// setup() runs once when the ESP32 boots.
void setup() {
  Serial.begin(115200);
  delay(200);

  bootMillis = millis();
  warmupStartMillis = millis();

  setupLeds();

  uint32_t bootStart = millis();
  while (millis() - bootStart < 1000) {
    updateBootLeds();
    delay(20);
    yield();
  }

  buildTopics();
  Wire.begin();

  initSensors();

  Serial.println("Sensor warm-up: dim white breathing until warm-up time completes.");
  startWifiConnection();
}

// =====================
// MAIN LOOP
// =====================
// loop() runs continuously.
// The sketch avoids long blocking delays so Wi-Fi, MQTT, OTA, LEDs, and sensors can all keep working.
void loop() {
  handleWiFi();

  if (WiFi.status() == WL_CONNECTED && otaReady) {
    ArduinoOTA.handle();
  }

  if (!sensorsWarmedUp) {
    if (millis() - warmupStartMillis >= BOOT_WAIT_MS) {
      sensorsWarmedUp = true;
      Serial.println("Sensor warm-up complete");
    }
  }

  if (lastSample == 0 || millis() - lastSample >= SENSOR_SAMPLE_MS) {
    lastSample = millis();
    sampleSensorsAndUpdateState();
  }

  if (!mqtt.connected()) {
    uint32_t now = millis();
    if (lastMqttAttempt == 0 || now - lastMqttAttempt >= MQTT_RETRY_MS) {
      lastMqttAttempt = now;
      mqttConnect();
    }
  }

  if (mqtt.connected()) {
    mqtt.loop();
  }

  bool wifiConnected = (WiFi.status() == WL_CONNECTED);

  // LED animation priority:
  // 1. OTA update in progress
  // 2. Wi-Fi connected flash
  // 3. Wi-Fi connecting animation
  // 4. Sensor warm-up animation
  // 5. Normal air score display
  if (wifiConnected) {
    if (otaInProgress) {
      updateOTALeds();
    } else if (connectedFlashActive) {
      updateConnectedFlash();
    } else if (!sensorsWarmedUp) {
      updateWarmupLeds();
    } else if (scoreDisplayEnabled) {
      updateEnvironmentLedsFromScore(latestAirScore);
    } else {
      ledsOff();
    }
  }

  if (sensorsWarmedUp && firstSampleTaken && millis() - lastPublish >= PUBLISH_MS) {
    lastPublish = millis();
    if (mqtt.connected()) {
      publishState();
    }
  }
}Warm-up and sensor behaviour
One of the easiest ways to make a project like this feel better in real use is handling sensor behaviour properly instead of just dumping raw values everywhere.
The PM sensor needs a short warm-up period after boot, so the first readings are not always reliable. It makes more sense to let it settle before treating the data as valid.
The SCD41 also benefits from sensible placement and stable operation. If it is boxed in badly or not given time to settle, the readings will be less useful than they should be.
The gas sensor needs the most context of all. I do not use it as an exact measurement tool. I use it as a way to spot when the air changes.
This is how I think about the whole sensor mix:
- PM and CO2 are the strongest core readings
- the gas sensor helps spot events
- temperature and humidity add context
What the data looks like in real life
This is where a build like this gets interesting.
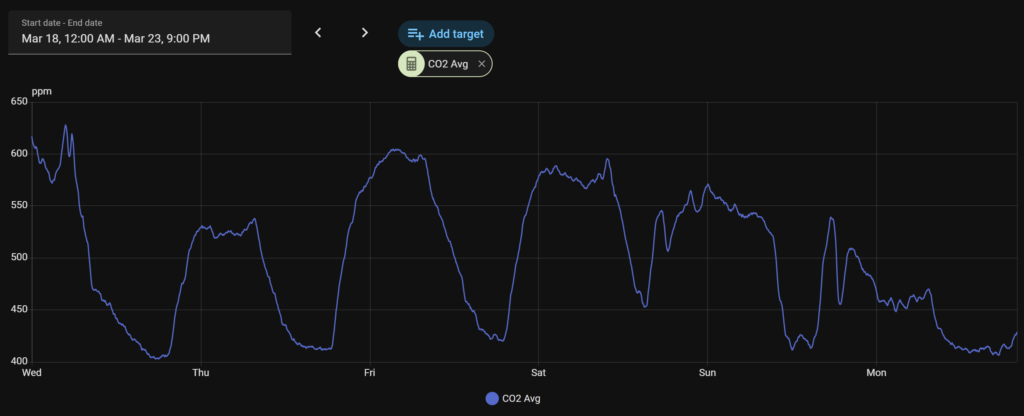
For CO2, one of the easiest tests is simply sitting in a small room with the door closed for a while. In that kind of space, the readings will usually climb over time. Open a window or improve ventilation, and they should start to drop again.
For particulate matter, cooking is a good test. Vacuuming and dusting are useful too. These can push PM readings up quickly, and then you can watch how long it takes for the room to clear.
For the gas sensor, sprays and fumes are where it becomes most useful. Cleaning products, deodorant, fly spray, candles, and cooking fumes can all create obvious changes in the readings.
That is one of the biggest benefits of combining multiple sensor types in one device. Different activities show up in different ways, and having that extra context makes it much easier to work out what is actually happening.
How I interpret the readings
For me, the most useful part of a setup like this is not just seeing numbers. It is learning what normal looks like in your own house.
A brief spike is not always a problem. Indoor air changes constantly during normal life. Cooking, cleaning, vacuuming, opening doors, and even just sitting in a small room for a while can all shift the readings.
With PM, I care more about what caused the increase and how long it lasts.
With CO2, I see it as one of the clearest indicators of whether a room is getting enough fresh air.
With the gas sensor, I focus on sudden changes rather than the absolute number.
The longer the monitor runs, the more useful it becomes. Over time, you start to recognise patterns in your own home and understand what pushes the readings up, what clears the air quickly, and which rooms need more ventilation than you thought.
That is really the point of the build. It turns that vague feeling of “the air feels off” into something you can actually see and respond to.
What I would improve next time
Even though this version is already useful, there is still plenty I would refine in a future revision.
A small display for live readings would be a nice addition. A light sensor so the device could dim itself at night would also make sense. The LEDs work well for quick visual status, but I would like to improve the enclosure so the infill pattern is less visible when they are lit.
On the software side, there is always room to keep refining thresholds, dashboards, and alert logic. That is one of the nice things about a build like this. Once the hardware is working well, the software side can keep improving over time.
Final thoughts
This project ended up being exactly what I wanted it to be: a practical, always-on indoor air quality monitor that gives useful data and integrates neatly into Home Assistant.
It is not about chasing perfect lab-grade accuracy. It is about making indoor air easier to understand in a way that is actually useful day to day.
If a room feels stale, I can check CO2. If cooking fills the air with particles, I can see it. If a spray or cleaner changes the air, the sensor usually catches that too.
More than anything, it removes the guesswork.
And once you can see what the air in a room is actually doing, it becomes much easier to know when to open a window, improve ventilation, or simply understand why a space feels off.
Disclaimer: This project is shared for educational purposes only. If you choose to build it, you do so at your own risk. Double-check wiring, follow safety guidelines, and never work on live circuits if you’re unsure.
FAQ
What does a DIY air quality sensor measure?
A DIY air quality sensor can measure things like PM2.5, PM10, CO2, temperature, humidity, pressure, and general gas changes depending on the sensors used.
Is CO2 useful for indoor air quality monitoring?
Yes. CO2 is one of the most useful readings for understanding ventilation in bedrooms, offices, and other closed rooms.
Can I use an ESP32 with Home Assistant for air quality monitoring?
Yes. An ESP32 is a good fit for a DIY Home Assistant air quality sensor because it can collect sensor data and send it to Home Assistant over Wi-Fi using MQTT or ESPHome.
Is this build meant to be lab accurate?
No. This build is designed to be practical and useful for trends, events, and general indoor air monitoring rather than certified scientific measurement.
Disclaimer: This project is shared for educational purposes only. If you choose to build it, you do so at your own risk. Double-check wiring, follow safety guidelines, and never work on live circuits if you’re unsure.
Some of the links in this post may be affiliate links. If you buy through them, I may earn a small commission at no extra cost to you.


Congratulations, very interesting project… Do you have any estimate for when you’ll publish the code and the wiring? I’d like to try building something similar.