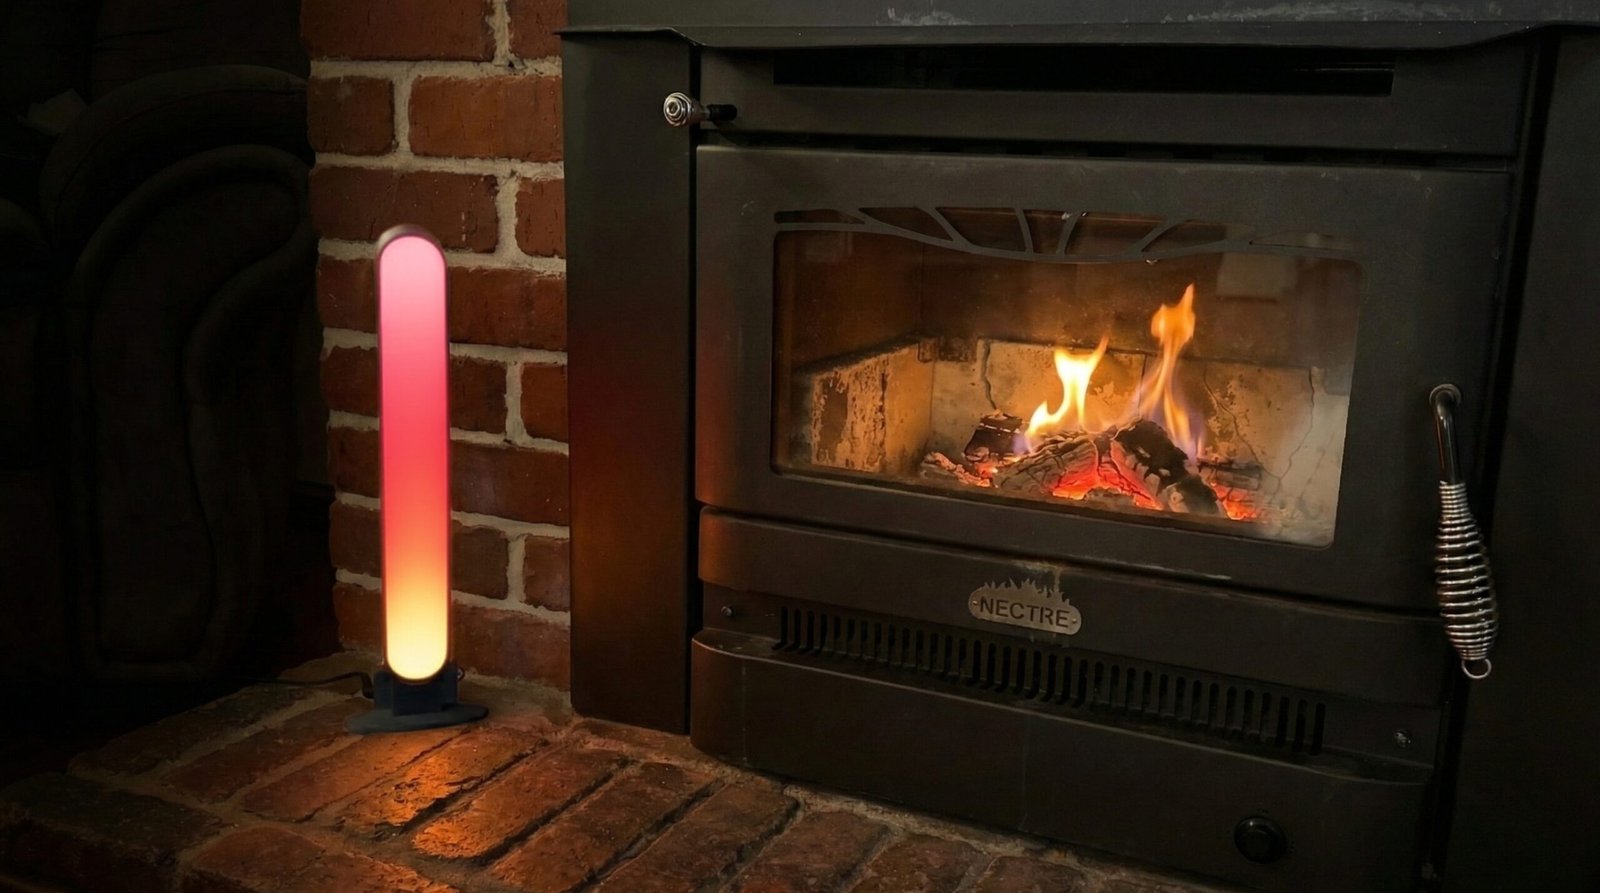
If you’ve been hunting for a tall, slim, smart LED light bar and nothing off-the-shelf quite fits, building your own is a solid option. With a 3D printer, an ESP32, and a simple LED driver board, you can make a custom bar that fits your setup perfectly and integrates with WLED and Home Assistant.
This guide walks through:
- Designing and printing the light bar housing
- Wiring the electronics (LED strip, driver and ESP32-C3)
- Flashing WLED
- Integrating with Home Assistant
- Rough cost comparison to a commercial light bar
You can follow it exactly, or adapt it to suit your own design.
What You’ll Build
- A 3D-printed LED light bar around 400 mm tall
- Addressable LED strip (e.g. WS2812 / NeoPixel-style)
- Powered by a Seeed Studio LED driver board
- Controlled by an ESP32-C3, running either your own code or WLED
- Fully controllable from your phone and Home Assistant

Parts and Tools
Core electronics
- ESP32-C3 board (XIAO or similar)
- Seeed Studio LED driver board (compatible with addressable LEDs)
- Addressable RGB LED strip (e.g. WS2812B, cut to 10 LEDs)
- 5V power supply (sized to your LED count – for 10 LEDs, even 1 A is plenty)
- Basic wires, connectors and heatshrink or electrical tape
If you don’t have a 3D printer:
Enclosure options
If you have a 3D printer (download STLs here):
- 3D-printed light bar housing
- 3D-printed diffuser (in white / translucent filament)
- PLA or PETG filament (you’ll use under half a 1 kg roll)
If you don’t have a 3D printer:
- Aluminium LED channel with a frosted diffuser, or
- PVC pipe / acrylic tube that can act as a housing and diffuser
Tools
- 3D printer
- Soldering iron and solder
- Small screwdriver
- Wire cutters / strippers
Step 1 – Design or Choose Your Housing
Option A: 3D-printed housing (FreeCAD or similar)
The bar design is fairly simple: a tall, narrow housing that holds:
- The LED strip along the inside
- The diffuser on the front
- Space at the base or rear for the driver board and ESP32-C3
Key design points:
- Height: around 400 mm gives a nice tall look for a desk or TV unit.
- Internal channel: wide enough to fit your LED strip and allow airflow.
- Mounting: include a flat base or mounting holes if you want it freestanding or wall-mounted.
Designing the diffuser
A good diffuser stops you seeing the individual LED hotspots and gives a smooth glow.
- Split the diffuser into two pieces (top and bottom) so it’s easier to print.
- To hide the join, add a small lip on one side that overlaps the joint:
- One half has a thin overlap.
- The other half slides underneath.
- Once you glue them together, the seam is much less noticeable and the light looks more even.
Tip: Print the diffuser in a white or translucent filament and use a higher infill or extra perimeters so it doesn’t turn see-through.
Step 2 – Prepare the LED Strip
- Cut the strip to 10 LEDs (or however many your design needs).
- Identify the 5V, GND, and Data In (DIN) pads.
- Tin the pads with a small amount of solder.
- Solder on three wires:
- 5V → red
- GND → black
- Data In → another colour (e.g. green)
Tip: If your first one or two LEDs behave strangely – flickering or not responding – and everything is wired correctly, don’t rule out a faulty strip. Sometimes swapping to a different strip (or brand) solves the issue instantly.
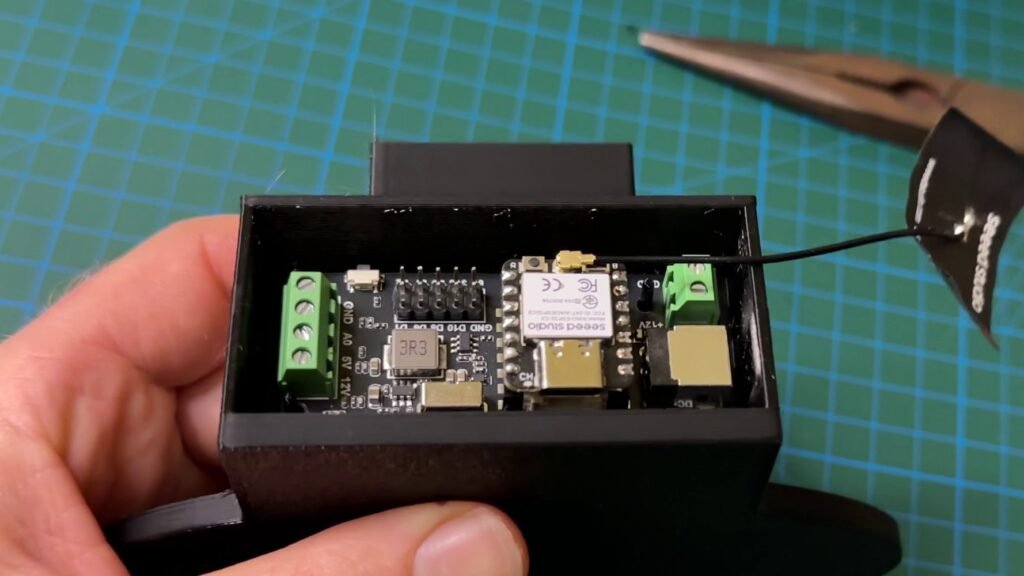
Step 3 – Wire the Driver Board and ESP32-C3
The Seeed Studio LED driver board sits between the ESP32 and the LED strip. It:
- Delivers stable power to the LEDs
- Buffers the data signal
- Adds some protection between the microcontroller and the strip
- Supports both 5V and 12V strips (check your exact board and strip)
XIAO ESP32-C3
A tiny ESP32-C3 board with Wi-Fi, Bluetooth LE, USB-C and battery charging support, making it a great option for compact IoT and ESPHome projects.

Basic wiring layout
General idea (exact pins may vary by board – always double-check the pinout):
- Power
- Power supply 5V → Driver board VIN / 5V
- Power supply GND → Driver board GND
- Driver board 5V output → LED strip 5V
- Driver board GND output → LED strip GND
- Data
- ESP32-C3 data pin (e.g. GPIO on your board) → Driver board data input
- Driver board data output → LED strip DIN
- ESP32 power
- ESP32-C3 powered either via USB or from the same 5 V supply (depending on your setup and board specs).
Make sure:
- All grounds are common (ESP32, driver board, LED strip, power supply).
- The strip voltage (5 V / 12 V) matches what the driver and strip are rated for.
Step 4 – Assemble the Smart LED Light Bar
- Install the LED strip
- Stick or mount the strip inside the 3D-printed housing in a straight line.
- Route the wires neatly down to the base or electronics compartment.
- Fit the diffuser
- Dry-fit the two diffuser halves first to make sure they slide together nicely.
- Glue the overlapping lip so the seam lines up as cleanly as possible.
- Attach the diffuser to the front of the housing.
- Mount the electronics
- Secure the driver board and ESP32-C3 inside the base or rear compartment.
- Ensure there’s some ventilation and you’re not pinching any wires.
Step 5 – Flash WLED to the ESP32-C3
You can run custom code on the ESP32 if you like, but WLED gives you a huge amount of control with almost no effort.
- Go to the WLED web installer (search for “WLED install ESP32”).
- Plug the ESP32-C3 into your computer via USB.
- Use the one-click installer:
- Select your board.
- Click Install and wait for it to flash.
- Once it’s flashed, connect to the temporary Wi-Fi network it creates and:
- Enter your home Wi-Fi details.
- Let the ESP32 reboot and join your network.
Step 6 – Configure WLED
Once WLED is on your Wi-Fi:
- Open the WLED web interface (or use the app to find it).
- Go to LED Preferences:
- Set the LED count to 10 (or however many you used).
- Choose the correct LED type (e.g. WS281x / NeoPixel).
- Test:
- Turn the light on.
- Try a few effects and colors to confirm everything responds correctly.
You now have:
- Brightness control
- Color control
- Dozens of built-in effects
- Presets for different moods (e.g. warm white, night light, party mode)
- Optional features like music sync, timers, and schedules
Step 7 – Integrate With Home Assistant
WLED integrates nicely with Home Assistant and shows up as a light entity.
Basic flow:
- In Home Assistant, go to Settings → Devices & Services.
- Add or enable the WLED integration.
- Home Assistant should auto-discover your WLED device on the network.
- Once added, you can:
- Control the light bar from your dashboard.
- Add it to automations and scenes (e.g. turn on at sunset).
- Use it as a notification light (e.g. pulse when an event occurs).
From here, you can go as simple or as advanced as you like – from basic on/off and color, to fully automated scenes across your whole smart home.
No 3D Printer? Alternative Housings
You can still build the same electronics and control system without printing a custom enclosure.
Some options:
- Aluminium LED channel with a frosted diffuser – commonly used for strip lights.
- PVC pipe – cut a slot and add a diffuser strip.
- Acrylic tube – mount the strip inside and cap the ends.
The result won’t look identical to a 3D-printed light bar, but functionally it’s the same:
- LED strip
- Driver board
- ESP32-C3 running WLED
Cost Breakdown (Approximate)
Here’s a rough idea of what this build costs:
- Seeed Studio LED driver board: ~$4.90
- ESP32-C3: ~$5.00
- 1 m addressable LED strip (using only part of it): ~$2.50
- 3D-printing filament (less than half a roll): ~$6.50 worth out of a $13 roll
- Miscellaneous (wiring, connectors, glue): a few extra dollars at most
In total, you’re looking at well under $20-$25.
For comparison, a commercial bar like the Philips Hue Play Light Bar is around $84, and you’re tied to the Hue ecosystem and bridge. With this DIY version, you control:
- The size and shape
- The number of LEDs
- The diffuser design
- How it integrates with your smart home
All with open-source tools like WLED and Home Assistant.
Ideas for Expanding the Project
Once you’ve built one light bar, it’s easy to scale the idea:
- Multiple bars: place several bars behind monitors, along a TV unit, or around a room, all synced via WLED.
- Different sizes: shorter bars for shelves, longer bars for walls or corners.
- Other layouts: under-desk lighting, behind a monitor, or as a backlight for a TV.
The control system stays the same – only the housing and LED count change.
Wrap Up
Building your own smart LED light bar is a great way to:
- Get exactly the shape and height you want
- Keep costs low
- Stay out of closed ecosystems
- Learn a bit about 3D design, electronics, and smart home integration
With an ESP32-C3, a Seeed Studio driver board, a short strip of addressable LEDs and a 3D-printed (or improvised) housing, you can put together a custom light bar that looks clean, works with WLED, and slots straight into Home Assistant.
You can tweak this guide to match your own style, but the overall idea stays the same: simple hardware, smart control, and a design that suits your space.
Disclaimer: This project is shared for educational purposes only. If you choose to build it, you do so at your own risk. Double-check wiring, follow safety guidelines, and never work on live circuits if you’re unsure.
Some of the links in this post may be affiliate links. If you buy through them, I may earn a small commission at no extra cost to you.


