If you’ve ever wondered whether your water tank is about to run dry, but couldn’t be bothered climbing a ladder or shining a torch in at night, this DIY water tank level sensor project is for you.
In this build I’m using an ESP32-C3, a waterproof ultrasonic sensor and a small solar/battery setup to measure the level of a water tank and send the percentage to Home Assistant. The ESP spends most of its time in deep sleep to save power and only wakes up to take a reading and sync with Home Assistant.
This post walks through the hardware, wiring, ESPHome config and Home Assistant setup so you can recreate this water tank level sensor or adapt it to your own tank.
What the Water Tank Level Sensor Does
At a high level:
- An ultrasonic sensor sits above the tank and measures the distance to the water surface.
- ESPHome converts that distance into a tank fill percentage based on your tank dimensions.
- The reading is sent to Home Assistant, where it’s stored and displayed as a simple percentage.
- The ESP then goes back to sleep for most of the time to save battery.
The nice part is that the last known reading is kept in Home Assistant, so even while the ESP is asleep you still see a “current” tank level instead of an “unavailable” sensor.
Hardware
- ESP32‑C3 Super Mini (any similar ESP32 board will work with minor tweaks)
- Ultrasonic Distance Sensor e.g. JSN‑SR04T for waterproof applications
- A02YYUW – More expensive but better reliability
- 6V 1W Solar Panel
- TP4056 Charging Module (for charging the Li-ion battery from the solar panel)
- 5v Boost Converter (steps battery voltage up to 5 V)
- 470μF Capacitor (helps smooth out current spikes when the ESP wakes)
- 1 kΩ + 2 kΩ resistors (voltage divider for the Echo pin)
- Soldering Iron
- Wires, headers and a small weatherproof enclosure (can be 3d printed)
- Li-ion Battery (single cell)
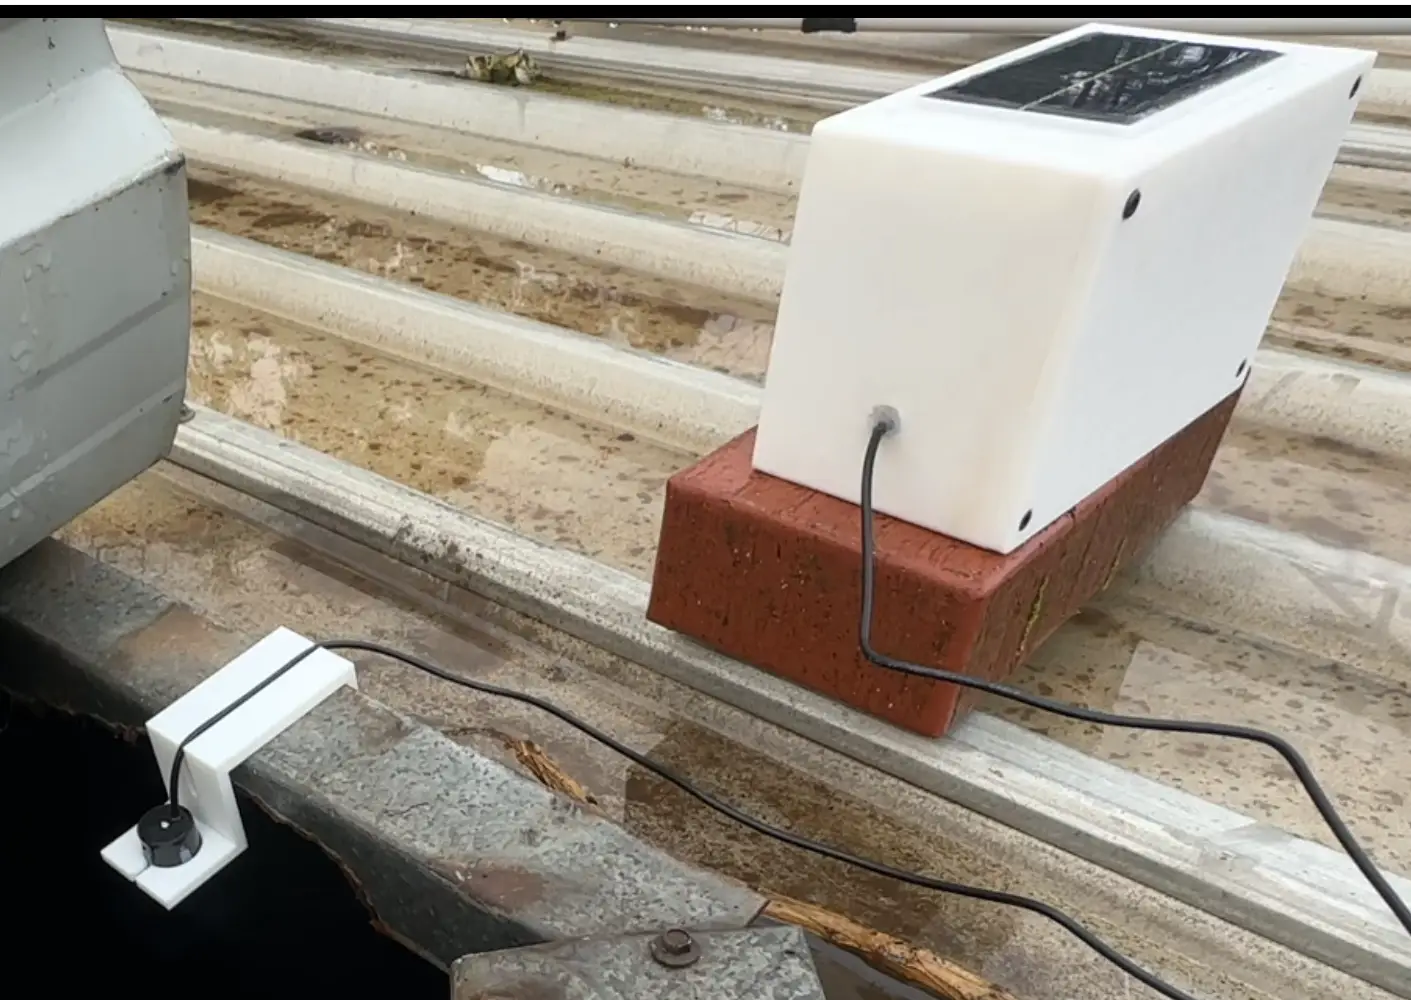
- Enclosure and Ultrasonic Sensor Mount (STLs can be downloaded here if you wish to 3D print)
Features
Here’s what this water level sensor does:
- Uses a waterproof ultrasonic sensor (AJ-SR04M or JSN-SR04T style) to measure tank level
- Converts distance → fill percentage so you can see “45% full” instead of a random number
- Uses deep sleep on the ESP32-C3 for much better battery life
- Stores the last known good reading in Home Assistant so the value stays visible between wake-ups
- Opens a 2-minute OTA update window each time it wakes, so you can push new firmware without pulling the device apart
- Designed to run from a small solar panel + Li-ion battery with minimal maintenance
You can use this as-is, or treat it as a starting point for more advanced automations (pump control, alerts, etc).
Seeed Studio XIAO ESP32-C3
The XIAO ESP32-C3 is a good alternative to the ESP32-C3 Super Mini

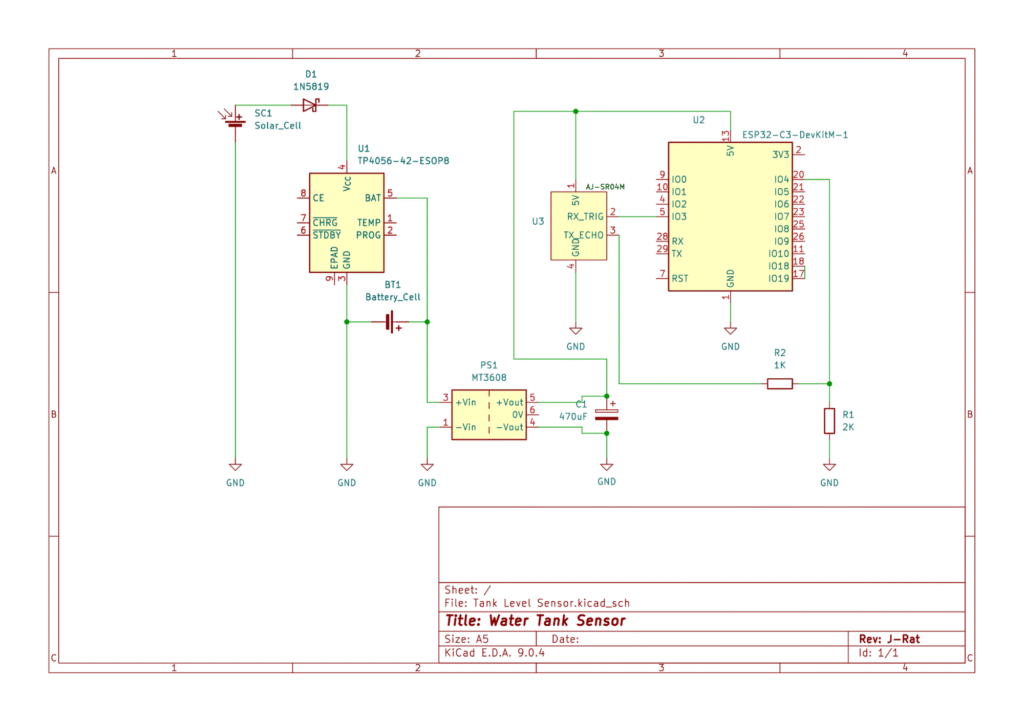
How the ultrasonic sensor wiring works
The ultrasonic sensor has four main pins: VCC, GND, Trigger, Echo.
In this project it’s wired like this:
- VCC → 5V (from the boost converter)
- GND → GND
- Trigger → GPIO 3 on the ESP32-C3 (you can change this in YAML if you want another pin)
- Echo → voltage divider → GPIO 2 on the ESP32-C3
The important bit is the Echo line. The sensor outputs around 5V on Echo, but ESP32 GPIOs are 3.3V only. Feeding 5V straight into a GPIO can damage the chip.
To fix that, we use a simple voltage divider:
- Echo → 2 kΩ resistor → node → 1 kΩ resistor → GND
- The node between the two resistors goes to GPIO 2 on the ESP32
This drops the voltage down to a safe level for the ESP while still giving a clean digital signal.
Power and solar setup
The goal is to have this thing sit on or near your tank without needing to replace batteries all the time.
The power chain looks like this:
- Solar panel → TP4056 input
- Solar + → TP4056 IN+
- Solar – → TP4056 IN–
- Battery → TP4056 output
- Battery + → TP4056 BAT+
- Battery – → TP4056 BAT–
- Boost converter
- TP4056 BAT+ and BAT– → boost converter input
- Boost converter output:
- 5 V → ESP32 5 V pin and ultrasonic sensor VCC
- GND → ESP32 GND and sensor GND
- Capacitor
- Put a 470 µF capacitor across the boost converter’s 5V and GND output.
That capacitor helps smooth out the initial current draw when the ESP32 wakes up, connects to Wi-Fi and does its thing. Without it, you can get brown-outs and random resets, especially on small solar setups.
ESPHome firmware
The brains of this project is an ESPHome YAML file that:
- Configures Wi-Fi, API and OTA
- Sets up the ultrasonic sensor
- Converts distance to a percentage based on
min_distanceandmax_distance - Handles deep sleep timings and retry behaviour
Basic workflow:
- Copy the
watertank-level.yamlfile into your ESPHome directory (e.g.esphome/watertank-level.yaml). - Update:
- Wi-Fi SSID and password
- API key
- OTA password
- Set sensible values for:
max_distance→ distance from sensor to tank bottom (empty tank)min_distance→ distance from sensor to water surface when the tank is full
- Compile and flash the firmware to your ESP32-C3.
esphome:
  name: watertank-level
  friendly_name: watertank_level

  # On boot, wait for Wi-Fi & API, allow OTA window, take a reading, then deep sleep
  on_boot:
    priority: -100
    then:
      - wait_until:
          condition:
            wifi.connected
          timeout: 15s

      - delay: 120s  # OTA update window after Wi-Fi connects (adjust as needed)

      - wait_until:
          condition:
            api.connected
          timeout: 30s

      - if:
          condition:
            and:
              - wifi.connected
              - api.connected
          then:
            - delay: 2s
            - component.update: tank_distance  # Trigger distance measurement
            - delay: 20s  # Wait for reading to stabilize
            - if:
                condition:
                  lambda: 'return id(sensor_success);'
                then:
                  - deep_sleep.enter:
                      id: deep_sleep_ctrl
                      sleep_duration: 5400s  # Sleep for 1.5 hours after a good reading
                else:
                  - deep_sleep.enter:
                      id: deep_sleep_ctrl
                      sleep_duration: 60s  # Retry quickly if reading fails
          else:
            - deep_sleep.enter:
                id: deep_sleep_ctrl
                sleep_duration: 300s  # Retry in 5 minutes if Wi-Fi/API fail

esp32:
  board: esp32-c3-devkitm-1 # <-- Change depending on the board you're using
  framework:
    type: esp-idf

logger:
  baud_rate: 115200  # Serial log speed

api:
  encryption:
    key: "YOUR_API_KEY"  # <-- Replace with your API key

ota:
  platform: esphome
  password: "YOUR_OTA_PASSWORD"  # <-- Replace with your OTA password

wifi:
  ssid: "YOUR_WIFI_SSID"      # <-- Replace with your Wi-Fi SSID
  password: "YOUR_WIFI_PASSWORD"  # <-- Replace with your Wi-Fi password
  output_power: 15dB  # Adjust transmit power as needed (or remove for default)

captive_portal:

deep_sleep:
  id: deep_sleep_ctrl

# Global variable to track if the sensor reading succeeded
globals:
  - id: sensor_success
    type: bool
    restore_value: no
    initial_value: 'false'

sensor:
  # Ultrasonic sensor for distance measurement
  - platform: ultrasonic
    trigger_pin: GPIO4        # <-- Adjust these pins for your setup
    echo_pin: GPIO3
    name: "Tank Distance"
    id: tank_distance
    update_interval: never    # Only update when manually triggered
    timeout: 4.0m
    accuracy_decimals: 2
    unit_of_measurement: "m"
    filters:
      - median:
          window_size: 5      # Smooth readings with median filter
          send_every: 1
          send_first_at: 1
      - lambda: |-      # Remove |- if you're getting compilation errors on line 96, 97, 98
        // Ignore readings above 3m (beyond sensor/tank range)
        if (x > 3.0) return NAN;
        return x;


    on_value:
      then:
        - if:
            condition:
              lambda: 'return !isnan(x);'
            then:
              - lambda: 'id(sensor_success) = true;'
        - component.update: tank_fill_level  # Update fill percentage

  # Template sensor to convert distance into fill percentage
  - platform: template
    name: "Tank Fill Level"
    id: tank_fill_level
    unit_of_measurement: "%"
    icon: "mdi:water-percent"
    accuracy_decimals: 1
    update_interval: never
    lambda: |-
      if (isnan(id(tank_distance).state)) {
        return NAN;  // Return no value if distance is invalid
      }

      float distance_cm = id(tank_distance).state * 100.0f;

      // --- USER CONFIGURABLE VALUES ---
      const float max_distance = 200.0f;  // Distance when tank is empty (in cm) - adjust!
      const float min_distance = 20.0f;   // Distance when tank is full (in cm) - adjust!
      // ---------------------------------

      if (distance_cm <= min_distance) {
        return 100.0f;  // Treat as full if at or below min
      }

      float filled = (max_distance - distance_cm) / (max_distance - min_distance) * 100.0f;

      if (filled < 0.0f) return 0.0f;
      if (filled > 100.0f) return 100.0f;
return filled;Home Assistant configuration
On the Home Assistant side, you’ll set up two main things:
- An input_number (or similar) that stores the “persistent” tank percentage
- A template sensor that reads from that input and exposes it as a normal sensor
These live in your configuration.yaml (or split YAML files if your setup is organised that way).
The idea is:
- ESPHome sends a new tank percentage when it wakes up
- An automation (see next section) updates the input_number
- Home Assistant always has a usable value to show, even while the ESP is asleep
After adding the config, restart Home Assistant so it picks up the new entities.
input_number:
  tank_fill_level_persistent:
    name: Tank Fill Level Persistent
    min: 0
    max: 100
    step: 0.1
    unit_of_measurement: "%"

template:
  - sensor:
      - name: "Tank Fill Level Retained"
        unique_id: tank_fill_level_retained
        unit_of_measurement: "%"
        device_class: battery
        state_class: measurement
        state: >
          {% set val = states('sensor.watertank_level_tank_fill_level') %}
          {% if val not in ['unavailable', 'unknown', None] %}
            {{ val | float | round(1) }}
          {% else %}
            {{ states('input_number.tank_fill_level_persistent') | float | round(1) }}
          {% endif %}
availability: trueAutomation: keeping the last known value
The automation is simple but important. It listens for new tank readings from ESPHome and updates the persistent value.
Rough logic:
- Trigger: when the ESPHome tank level sensor updates
- Condition: optionally check that the reading is valid (not
unknownorunavailable) - Action: set the input_number value to the new tank percentage
Once you add this to automations.yaml, reload automations or restart Home Assistant.
From then on, your Lovelace card can point to the “persistent” tank level entity and it will stay populated between readings.
- alias: "Update Tank Fill Level Persistent"
  trigger:
    - platform: state
      entity_id: sensor.watertank_level_tank_fill_level
  condition:
    - condition: template
      value_template: >
        {{ trigger.to_state.state not in ['unavailable', 'unknown', '', None] }}
  action:
    - service: input_number.set_value
      target:
        entity_id: input_number.tank_fill_level_persistent
      data:
value: "{{ trigger.to_state.state | float }}"Calibration
Calibration is just about telling ESPHome what “empty” and “full” look like in terms of distance.
You’ll set:
max_distance→ distance (in cm) from the sensor to the bottom of the tankmin_distance→ distance from the sensor to the water surface when full
A simple way to do it:
- When the tank is empty (or as empty as practical), measure from the sensor to the bottom → set this as
max_distance. - When the tank is full, measure from the sensor to the water surface → set this as
min_distance. - Flash the updated firmware.
- Watch the ESPHome logs as the level changes over a few days to make sure the percentage looks reasonable.
You can fine-tune these values if it seems a bit off around the top or bottom.
How it behaves day to day
A normal cycle looks like this:
- ESP wakes from deep sleep.
- It connects to Wi-Fi and the Home Assistant API.
- A 2-minute OTA window opens so you can flash new firmware if needed.
- The ultrasonic sensor takes a distance reading.
- ESPHome converts it to a percentage and sends it to Home Assistant.
- If the reading succeeds, the ESP goes back to deep sleep for 1.5 hours.
- If the reading fails (for whatever reason), it waits 1 minute, tries again, and then goes back to sleep.
Most of the time the device is asleep, which is why the solar + battery combo works well even with a small panel.
Where to go from here
Once the basic setup is working, you can build on it:
- Send notifications when the tank drops below a certain percentage
- Show the tank level on a dedicated “water” dashboard
- Log historical data to see how fast you use water over the seasons
- Add more sensors (battery voltage, panel voltage, etc.) to keep an eye on the power system
The core of the project is this ESP32-C3, ultrasonic sensor and solar setup. After that, it’s just YAML and automations.
If you want to try a different sensor rather than an ultrasonic one, I wrote a blog post here exploring the range of different options available.
Disclaimer: This project is shared for educational purposes only. If you choose to build it, you do so at your own risk. Double-check wiring, follow safety guidelines, and never work on live circuits if you’re unsure.
Some of the links in this post may be affiliate links. If you buy through them, I may earn a small commission at no extra cost to you.


Nice project! What did you use to mount the sensor at the top of the tank?
Thank you! I 3D printed a mount for the ultrasonic sensor that fits nicely on the lip of the tank lid. The enclosure itself is just freestanding, I haven’t got around to mounting it properly yet.
J-Rat,
Great little project.
I had done similar using a Pico W and the SENS0208 US sensor (unreliable on 3.3v) but had not thought of the step up regulator. I’ve pinched your idea (thank you) and am now fault finding some weird fault where the SENS0208 is unreliable when powered on 5v from the reg.
Thank you, I’m glad I could help! I hope you can figure out your issue, I know how much of a pain it can be trying to diagnose something that “should” just work.
Hi! I’m planning to build this device as my first esp project. I have a power outlet near my tank for the pump. I guess I could go without the solar + battery combo and just plug the esp to the current, right?
Hello! Yep, exactly! It will be a much simpler set-up for you. You’ll be able to take readings way more often and even put in some more sensors if you wanted to (temp, humidity etc)
J-Rat.
I’ve proved everything works (Regulator and SENS0208) when using a Pi or Pi Zero 2 W. Things fail if I use a Pico. I can only assume the the Pico’s 3v3 pin is being overloaded by the regulator.
I too have power near the tank which if I use it, simplifies things a lot and I can use the cheaper Pico and do away with the regulator.
Cheers.
Awesome, thanks for the update Mark. Really appreciate you taking the time to test it all and share what you found. And yep, having power near the tank definitely makes the whole setup a lot simpler. Cheers!
Hi J-Rat,
Awesome project. I decided to build it for my first ever electronic/Home Assistance project. I think I have done everything as I should and in the logs of ESP I can see the reading of the level(still have it on my desk testing before installing in my printed box and putting it on my tank) but for some reason it does not seem to be populating anything in Home Assistant. As said I am new to this so not sure if I have setup Home Assistant correctly.
Could you give me some guidance here pls?
I solved my problem.
Sorry for the slow reply, how did you end up fixing it?
All good, I know everyone is busy. My Problem communication between ESP-Home and Home Assistant and was a rookie moment as I am new to all of this. I got the communication going and the data started to come in.
I see you have redesigned the project and have a few other comments now. My 1 water tank is about 15m away from my Wi-Fi router and signal wasn’t create and my other tank is about 50m away and want to build a sensor for it as well so my problem is distance now.
Any recommendation will be good?
Ah okay, good to hear!
That’s also my next problem, I have a tank that is roughly the same distance away. I’m thinking I’ll need to use LoRa for this, I’ve picked up a couple of Heltec v4 devices and plan to test them. If you go down the same route, you will need one of the devices to be in/near your house that remains always on and acts as the “hub”, while the sensor will stay sleeping until it sends the data.
Can I add a buzzer? How do I do it, especially in coding?
Yep, you can definitely add a buzzer.
The only thing to keep in mind is the sensor spends most of its time in deep sleep to save power, so a buzzer on the unit will only beep while it’s awake (during a reading/update).
If you want an alert you’ll actually notice every time, the easiest option is to trigger it from Home Assistant instead (phone notification, siren, speaker, etc). If you still want a buzzer on the device, you just wire an active buzzer to a spare GPIO (ideally through a small transistor) and then turn that pin on for a few seconds when the level drops below your threshold.
Thank you, I will have a look down that route.